camry repair manual
Camry Repair Manual AIR CONDITION
Ngày tải lên :
28/04/2014, 12:52
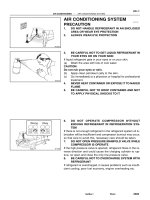
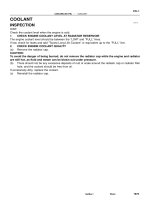
... detector and repair if neces-
sary
(2) Charge proper amount of re-
frigerant
(3) If indicated pressure value is
near 0 when connected to gauge,
create the vacuum after inspecting
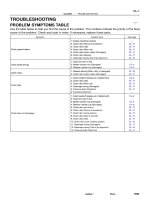
and repairing the ... sure to read the following item carefully, then
follow the correct procedure described in the repair manual.
AC0M1–01
AC–36
–AIR CONDITIONING BLOWER UNIT
2518AuthorĂ: DateĂ:
DISASSEMBLY
1. REMOVE ... both hand
valves of manifold gauge set and stop the vacuum pump.
Check the system for leaks and repair necessary.
(e) Close both the high and low hand valves and stop the vac-
uum pump.
(f) Leave...
- 94
- 402
- 0

Camry Repair Manual AUTOMATIC TRANSAXLE
Ngày tải lên :
28/04/2014, 12:53
... bolt.
(c) Pry up the pipe with a screwdriver and remove the pipe.
8. REMOVE MANUAL VALVE BODY
Remove the 5 bolts and manual valve body.
9. REMOVE CONNECTOR CLAMP AND PIPE RETAINER
Remove the 2 ... PARK/NEUTRAL POSITION (PNP) SWITCH
AX–5
1925A uthorĂ: DateĂ:
PARK/NEUTRAL POSITION (PNP)
SWITCH
ON–VEHICLE REPAIR
1. DISCONNECT PARK/NEUTRAL POSITION SWITCH
CONNECTOR
2. REMOVE PARK/NEUTRAL POSITION SWITCH
(a) ... TRANSAXLE (A140E) DIFFERENTIAL OIL SEAL
AX–11
1904A uthorĂ: DateĂ:
DIFFERENTIAL OIL SEAL
ON–VEHICLE REPAIR
1. REMOVE LH AND RH DRIVE SHAFTS
(See page SA–17)
2. REMOVE SIDE GEAR SHAFT OIL SEAL
Using...
- 58
- 437
- 0
Camry Repair Manual AUTOMATIC TRANSAXLE MANUAL
Ngày tải lên :
28/04/2014, 13:01
... to
another, thus controlling shifting and lock–up timing.
INTRODUCTION GENERAL REPAIR INSTRUCTIONS–
IN–4
GENERAL REPAIR INSTRUCTIONS
1. Use fender, seat and floor covers to keep the vehicle
clean ... the same time.
The component groups are inspected and repaired from the converter housing side.
As much as possible, complete the inspection, repair and assembly before proceeding to the next com-
ponent ... hammer and punch, drive out the pin.
(d) Slide out the shaft and remove the manual valve lever
from the case.
57. REMOVE MANUAL SHAFT OIL SEAL
Remove the oil seal with a screwdriver.
AUTOMATIC TRANSAXLE...
- 429
- 380
- 0
Camry Repair Manual BODY ELECTRICAL
Ngày tải lên :
28/04/2014, 13:03
... Door lock manual switch OFF or UNLOCK No continuity
A1 – Ground Door lock manual switch LOCK Continuity
A2 – Ground Door lock manual switch OFF or LOCK No continuity
A2 – Ground Door lock manual ... No.1)
5. Wire Harness
–
–
–
BE–70
–
Door lock system does not operate by manual switch.
1. Power Window Master Switch
2. Door Lock Manual Switch
3. Integration Relay (I/P J/B No.1)
4. Wire Harness
BE–60
BE–70
BE–70
–
Door...
- 135
- 351
- 0

Camry Repair Manual BODY ELECTRICAL BODY
Ngày tải lên :
28/04/2014, 13:07
... lock manual switch OFF or UNLOCK No continuity
A16 – Ground Door lock manual switch LOCK Continuity
A17 – Ground Door lock manual switch OFF or LOCK No continuity
A17 – Ground Door lock manual ... No.1)
5. Wire Harness
–
–
–
BE–70
–
Door lock system does not operate by manual switch.
1. Power Window Master Switch
2. Door Lock Manual Switch
3. Integration Relay (I/P J/B No.1)
4. Wire Harness
BE–60
BE–70
BE–70
–
Door...
- 298
- 305
- 1

Camry Repair Manual DIAGNOSTICS
Ngày tải lên :
28/04/2014, 13:17
... value on the OBD II scan tool or TOYOTA
hand–held tester.
OK:
Temperature value: –40°C (–40°F)
OK Repair or replace harness or connector.
NG
Check and replace ECM (See page IN–31).
DI00M–05
P01242
Manifold ... on the OBD II scan tool or TOYOTA
hand–held tester.
OK:
Temperature value: –40°C (–40°F)
OK Repair or replace harness or connector.
NG
Check and replace ECM (See page IN–31).
A00393
ON
Intake ... tester.
OK:
Temperature value: 140°C (284°F) or more
OK Open in harness between terminals E2 or THA,
repair or replace harness.
NG
Confirm good connection at ECM. If OK,
check and replace ECM (See...
- 1.3K
- 442
- 0
Camry Repair Manual EMISSION CONTROL
Ngày tải lên :
28/04/2014, 13:17
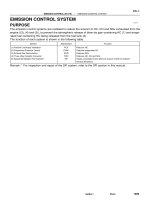
... of fuel for reduced
exhaust emissions
Remark: * For inspection and repair of the SFI system, refer to the SFI section in this manual.
B06548
Battery
B06545
B06543
Hose Clipper
Air Drain Hose
–EMISSION ... of fuel for reduced
exhaust emissions
Remark: * For inspection and repair of the SFI system, refer to the SF section of this manual.
B01252
Air
Disconnect
Air Inlet Line Hose
B01253
Pinch
Push
AA
Pinch
B01148
B01149
Air
Purge ... damage.
If any part of the protector is damaged or dented to the extent that it contacts the WU–TWC, repair or replace
it.
3. INSPECT WU–TWC HEAT INSULATOR
(a) Check the heat insulator for damage.
(b)...
- 35
- 325
- 0


Camry Repair Manual INTRODUCTION
Ngày tải lên :
28/04/2014, 13:25
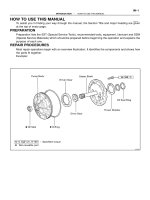
... TO USE THIS MANUAL
IN–1
1AuthorĂ: DateĂ:
HOW TO USE THIS MANUAL
GENERAL INFORMATION
1. INDEX
An INDEX is provided on the first page of each section to guide you to the item to be repaired. To ... system.
FI1066
IN0CO–04
Z11554
Seal Lock Adhesive
IN–4
–INTRODUCTION REPAIR INSTRUCTIONS
4AuthorĂ: DateĂ:
REPAIR INSTRUCTIONS
GENERAL INFORMATION
BASIC REPAIR HINT
(a) Use fender, seat and floor covers to keep ... replace them with new parts.
(5) Before repairs, remove the airbag sensor if shocks
are likely to be applied to the sensor during repairs.
(6) Never disassemble and repair the airbag sensor as-
sembly,...
- 84
- 236
- 0


- toyota camry factory service repair manual 2000
- toyota camry repair manual 2000
- 2000 toyota camry haynes repair manual
- 2000 toyota camry repair manual download
- 2000 toyota camry repair manual free download
- 2000 toyota camry repair manual pdf
- 2000 toyota camry repair manual free
- 2000 toyota camry repair manual pdf download
- 2000 toyota camry repair manual
Tìm thêm:
- hệ việt nam nhật bản và sức hấp dẫn của tiếng nhật tại việt nam
- xác định các mục tiêu của chương trình
- xác định các nguyên tắc biên soạn
- khảo sát các chuẩn giảng dạy tiếng nhật từ góc độ lí thuyết và thực tiễn
- khảo sát chương trình đào tạo của các đơn vị đào tạo tại nhật bản
- khảo sát chương trình đào tạo gắn với các giáo trình cụ thể
- xác định thời lượng học về mặt lí thuyết và thực tế
- tiến hành xây dựng chương trình đào tạo dành cho đối tượng không chuyên ngữ tại việt nam
- điều tra đối với đối tượng giảng viên và đối tượng quản lí
- điều tra với đối tượng sinh viên học tiếng nhật không chuyên ngữ1
- khảo sát thực tế giảng dạy tiếng nhật không chuyên ngữ tại việt nam
- khảo sát các chương trình đào tạo theo những bộ giáo trình tiêu biểu
- nội dung cụ thể cho từng kĩ năng ở từng cấp độ
- xác định mức độ đáp ứng về văn hoá và chuyên môn trong ct
- phát huy những thành tựu công nghệ mới nhất được áp dụng vào công tác dạy và học ngoại ngữ
- mở máy động cơ lồng sóc
- mở máy động cơ rôto dây quấn
- các đặc tính của động cơ điện không đồng bộ
- hệ số công suất cosp fi p2
- đặc tuyến hiệu suất h fi p2