2000 toyota camry haynes repair manual

Toyota 7k engine repair manual
... @TOYOTA ' } REPAIR MANUAL Jul., 1995 ; ·, \ INTRODUCTION ENGINE IGNITION SYSTEM STARTING SYSTEM CHARGING SYSTEM • • j; •• ~ ··:d , ~ 'Ơ ã -:_,., , , ;:/Ã :_~,.r;t.: FOREWORD '· This repair ... THIS MANUAL HOW TO USE THIS MANUAL INDEX An INDEX is provided on the first page of each section to guide you to the item to be repaired To assist y.:OtJ in finding your way through the manual, ... notice TOYOTA MOfOR CORPO{Ul.TION • • • ©1995TOYOTA MOTOR CORPORATION All rights reserved This book may not be reproduced or copied, in whole or in part, withtlut the written permission of Toyota
Ngày tải lên: 03/09/2021, 12:01

TOYOTA 4Y ENGINE REPAIR MANUAL
... This repair manual explains the repair points of the 4Y model engine equipped on the Toyota Forklift Trucks Please make good use of this manual for your technical service This repair manual ... I Compression ratio ProCarManuals.com t Wedge type Bore x stroke g1PS.h (rpm) Refer to repair manual for each vehicle model No-load maximum speed rpm Refer to repair manual for each vehicle model ... ProCarManuals.com ProCarManuals.com Published by TOYOTA Material Handling Company A Division of TOYOTA INDllSTRlES CORPORATION 1st Printing: Aug 2006 Pub No CE663 Printed in USA ProCarManuals.com
Ngày tải lên: 08/05/2023, 01:12

TOYOTA A340E TRANSMISSION REPAIR MANUAL
... ProCarManuals.com ProCarManuals.com ProCarManuals.com ProCarManuals.com ProCarManuals.com ProCarManuals.com ProCarManuals.com ProCarManuals.com ProCarManuals.com ProCarManuals.com ProCarManuals.com ... MENU ProCarManuals.com GO TO PAGE ProCarManuals.com ProCarManuals.com ProCarManuals.com ProCarManuals.com ProCarManuals.com ProCarManuals.com ProCarManuals.com ProCarManuals.com ProCarManuals.com ... ProCarManuals.com ProCarManuals.com ProCarManuals.com ProCarManuals.com ProCarManuals.com ProCarManuals.com ProCarManuals.com ProCarManuals.com
Ngày tải lên: 08/05/2023, 01:30

2009 2012 toyota corolla body repair manual sua chua than vo
... the repair procedures and specifications other than collisiondamaged body components of the TOYOTA COROLLA refer to the repair manuals If you require the above manuals, please contact your TOYOTA ... FOREWORD This repair manual has been prepared to provide essential information on body panel repair methods (including cutting and welding operations, but excluding painting) for the TOYOTA COROLLA ... be noted that the front fenders of the TOYOTA model is bolted on and require no welding When repairing, don’t cut and join areas that are not shown in this manual Only work on the specified contents
Ngày tải lên: 08/11/2023, 10:11

Toyota camry 2006 2011 body repair manual hướng dẫn sửa chữa thân xe toyota camry đời 2006 2011
... the repair procedures and specifications other than collisiondamaged body components of the TOYOTA CAMRY refer to the repair manuals If you require the above manuals, please contact your TOYOTA ... FOREWORD This repair manual has been prepared to provide essential information on body panel repair methods (including cutting and welding operations, but excluding painting) for the TOYOTA CAMRY Applicable ... Gloves INTRODUCTION IN-2 PRECAUTIONS FOR REPAIRING BODY STRUCTURE PANELS Toyota prohibits the use of the heat repair method on body structure panels when repairing a vehicle damaged in a collision
Ngày tải lên: 24/05/2014, 13:18
Camry Repair Manual AIR CONDITION
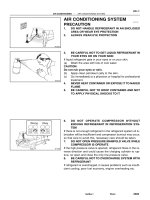
... sure to read the following item carefully, then follow the correct procedure described in the repair manual. AC0LI–02 N20242 Sight Glass –AIR CONDITIONING AIR CONDITIONING SYSTEM AC–3 2485AuthorĂ: ... detector and repair if neces- sary (2) Charge proper amount of re- frigerant (3) If indicated pressure value is near 0 when connected to gauge, create the vacuum after inspecting and repairing the ... Bubbles present in sight glass Insufficient* (1) Check for gas leakage with gas leak de- tector and repair if necessary (2) Add refrigerant until bubbles disappear 2 No bubbles present in sight glass
Ngày tải lên: 28/04/2014, 12:52

Camry Repair Manual AUTOMATIC TRANSAXLE
... kgf·cm, 7 ft·lbf) 18. INSTALL MANUAL VALVE BODY DETENT SPRING AND MANUAL VALVE BODY (a) Align the manual valve with the pin on the manual shaft lever. (b) Lower the manual valve body into place. ... (non–magnetic): bushing wear 4. REMOVE MANUAL VALVE BODY DETENT SPRING AND MANUAL VALVE BODY (a) Remove the detent spring on the manual valve body. (b) Remove the manual valve body. 5. REMOVE OIL STRAINER ... ft·lbf) (d) Place the detent spring on the manual valve body and temporarily install the 2 bolts first. Torque: 10 N·m (100 kgf·cm, 7 ft·lbf) (e) Check that the manual valve lever is touching the center
Ngày tải lên: 28/04/2014, 12:53
Camry Repair Manual EMISSION CONTROL
... B06544 TOYOTA Hand–Held Tester DLC3 (c) TOYOTA Hand–Held Tester: Forced driving of the VSV for the EVAP (1) Connect a TOYOTA hand–held tester to the DLC3 (2) Start the engine (3) Push the TOYOTA ... malfunctioning (f) TOYOTA Hand–Held Tester: Conclude forced driving of the VSV for the EVAP (1) Stop the engine (2) Disconnect the TOYOTA hand–held tester from the DLC3 (g) If you have no TOYOTA Hand–Held ... purge line B06544 (c) TOYOTA Hand–Held Tester: Forced driving of the VSV for the EVAP (1) Connect a TOYOTA hand–held tester to the DLC3 (2) Start the engine (3) Push the TOYOTA hand–held tester
Ngày tải lên: 28/04/2014, 13:17

Camry Repair Manual ENGINE MECHANICAL
... CONNECT TOYOTA HAND–HELD TESTER OR OBDII SCAN TOOL Remove the fuse cover on the instrument panel Connect a TOYOTA hand–held tester or OBDII scan tool to the DLC3 Please refer to the TOYOTA hand–held ... CONNECT TOYOTA HAND–HELD TESTER OR OBDII SCAN TOOL (a) Remove the fuse cover on the instrument panel (b) Connect a TOYOTA hand–held tester or OBDII scan tool to the DLC3 (c) Please refer to the TOYOTA ... timing mark moves in a range between 0° and 10° DISCONNECT TIMING LIGHT FROM ENGINE DISCONNECT TOYOTA HAND–HELD TESTER OR OBDII SCAN TOOL AuthorĂ: DateĂ: 1181 EM–10 ENGINE MECHANICAL (5S–FE)
Ngày tải lên: 28/04/2014, 13:24

Camry Repair Manual INTRODUCTION
... TO USE THIS MANUAL IN–1 1AuthorĂ: DateĂ: HOW TO USE THIS MANUAL GENERAL INFORMATION 1. INDEX An INDEX is provided on the first page of each section to guide you to the item to be repaired. To ... being repaired. D HINTS are separated from the text but do not appear in bold. They provide additional information to help you perform the repair efficiently. 9. SI UNIT The UNITS given in this manual ... IN0CO–04 Z11554 Seal Lock Adhesive IN–4 –INTRODUCTION REPAIR INSTRUCTIONS 4AuthorĂ: DateĂ: REPAIR INSTRUCTIONS GENERAL INFORMATION BASIC REPAIR HINT (a) Use fender, seat and floor covers to keep
Ngày tải lên: 28/04/2014, 13:25

Camry Repair Manual MANUAL TRANSAXLE
... (370, 27) –MANUAL TRANSAXLE (E153) MANUAL TRANSAXLE UNIT MX–3 1804A uthorĂ: DateĂ: MANUAL TRANSAXLE UNIT COMPONENTS MX050–01 Q09982 Q09983 Q09984 Q09985 MX–4 –MANUAL TRANSAXLE (E153) MANUAL TRANSAXLE ... Pipe MX–10 –MANUAL TRANSAXLE (E153) MANUAL TRANSAXLE ASSEMBLY 1811A uthorĂ: DateĂ: MANUAL TRANSAXLE ASSEMBLY COMPONENTS [...]... AuthorĂ: DateĂ: 1822 MX–22 MANUAL TRANSAXLE (E153) – MANUAL ... MX04X–01 –MANUAL TRANSAXLE (E153) MANUAL TRANSAXLE SYSTEM MX–1 1802A uthorĂ: DateĂ: MANUAL TRANSAXLE SYSTEM PRECAUTION When working with FIPG material,
Ngày tải lên: 28/04/2014, 13:27

Camry Repair Manual PREPARATION
... (1MZ–FE) EMISSION CONTROL... PP–18 PREPARATION – SFI (5S–FE) PP0JX–04 RECOMMENDED TOOLS 09082–00040 TOYOTA Electrical Tester 09258–00030 Hose Plug Set Plug for vacuum hose, fuel hose etc AuthorĂ: ... Tool Set 09231–14010 Punch AuthorĂ: DateĂ: 76 PP–25 PREPARATION – COOLING (5S–FE) PP0K0–03... ”Toyota Long Life Coolant” or equivalent DateĂ: 79 PP–28 PREPARATION – COOLING (1MZ–FE) COOLING ... AuthorĂ: DateĂ: 80 PP–29 PREPARATION – COOLING (1MZ–FE) PP0C1–03 RECOMMENDED TOOLS 09082–00040 TOYOTA Electrical Tester AuthorĂ: DateĂ: 81 PP–30 PREPARATION – COOLING (1MZ–FE) PP0C2–02 EQUIPMENT
Ngày tải lên: 28/04/2014, 13:31

Camry Repair Manual RESTRAINT SYSTEM
... sure to read the following items carefully, then follow the correct procedures described in the repair manual F Malfunction symptoms of the SRS are difficult to confirm, so the DTCs become the most ... up power supply from outside the vehicle F Before repairs, remove the airbag sensor if shocks are likely to be applied to the sensor during repairs F Do not expose the steering wheel pad, front ... from another vehicle When replacing parts, replace them with new parts F Never disassemble and repair the steering wheel pad, front passenger airbag assembly, side airbag assembly, airbag sensor
Ngày tải lên: 28/04/2014, 13:32

Camry Repair Manual SFI
... the active test mode on the TOYOTA hand– held tester. (4) Please refer to the TOYOTA hand–held tester oper- ator’s manual for further details. (5) If you have no TOYOTA hand–held tester, connect ... Select the ACTIVE TEST mode on the TOYOTA hand– held tester. (d) Please refer to the TOYOTA hand–held tester operator’s manual for further details. (e) If you have no TOYOTA hand–held tester, connect ... the TOYOTA hand– held tester (j) Please refer to the TOYOTA hand–held tester operator’s manual for further details AuthorĂ: DateĂ: 1456 SF–24 SFI (5S–FE) (k) – INJECTOR If you have no TOYOTA
Ngày tải lên: 28/04/2014, 13:35

Camry Repair Manual 87 91 collision
... Painting Procedures Fundamental Body Repair Procedures Electrical Wiring Diagram (Ex USA and Canada) (USA and Canada) CAMRY Chassis and Body Repair Manual CAMRY Repair Manual (USA and Canada) 36438E ... specifications and repair procedures other than collision-damaged body components of the TOYOTA CAMRY, refer to the following repair manuals. All information contained in this manual is the most ... Trang 1Manual Name Pub No.1S, 1S-E, 2S, 2S-C, 2S-E, 3S-FE & 3S-GE Engine Repair Manual (Ex USA and Canada) 1C, 2C & 2C-T Engine Repair Manual (Ex USA and Canada) Fundamental
Ngày tải lên: 29/04/2014, 08:46

Camry Repair Manual 90 EWD
... listed in this manual, refer to the following manuals; Manual Name Pub. No. S1990 Camry Repair Manual Volume 1 Volume 2 STCCS (3S–FE) Diagnosis Manual SECT (A140E) Diagnosis Manual SECT (A540E) ... diagram manual has been prepared to provide information on the electrical system of the 1990 TOYOTA CAMRY. Applicable models: SV21, 25 series VZV21 series For service specifications and repair ... change without notice. TOYOTA MOTOR CORPORATION 2 INTRODUCTION This manual consists of the following 12 sections: No. Section Description 1 INDEX Index of the contents of this manual. 2 INTRODUCTION
Ngày tải lên: 29/04/2014, 08:54

Camry Repair Manual Air conditioning
... compressed air NOTICE: Never use water to clean the evaporator CHECK FITTINGS FOR CRACKS OR SCRATCHES Repair as necessary ASSEMBLY OF COOLING UNIT INSTALL COMPONENTS ON EVAPORATOR (a) Connect the expansion ... compressed air NOTICE: Never use water to clean the evaporator CHECK FITTINGS FOR CRACKS OR SCRATCHES Repair as necessary ASSEMBLY OF COOLING UNIT INSTALL COMPONENTS ON EVAPORATOR (a) Connect the expansion ... that there is no continuity between each terminal and the VSV body If a short circuit is found, repair or replace the VSV CHECK FOR OPEN CIRCUIT Using an ohmmeter, measure the resistance between
Ngày tải lên: 29/04/2014, 09:07

Camry Repair Manual Body electrical
... motor Check switch Repair as necessary Wipers do not operate i n... Wiper motor faulty Wiring or ground faulty Washers do not operate Check relay Check switch Check motor Repair as necessary ... faulty Wiring faulty BE–3 BE–28 BE–26 BE–3 BE–29 BE–29 BE–26 BE–28 BE–26 Repair as necessary Replace motor Check switch Repair as necessary BE–29 BE–29 BE–29 BE–29 Front Wiper and Washer Switch ... HINT: Specifications may vary depending on the type of tester, so refer to the tester’s instruction manual before per- forming the inspection. Check LED (Light Emitting Diode) in the same manner as
Ngày tải lên: 29/04/2014, 09:47

Camry Repair Manual Brake
... Replace brake shoes Replace pads Repair leak Repair or replace master cylinder Bleed brake system Repair wheel cylinder Repair cylinder Repair brake cylinder Repair or replace adjuster Air in ... Replace brake shoes Replace pads Repair leak Repair or replace master cylinder Bleed brake system Repair wheel cylinder Repair cylinder Repair brake cylinder Repair or replace adjuster Air in ... brake Repair as necessary Adjust push rod Replace spring Repair as necessary Replace shoe Replace pad Repair as necessary Replace pads Replace drum or disc Replace spring Repair wheel cylinder Repair
Ngày tải lên: 29/04/2014, 09:55

Camry Repair Manual Charging
... alternator faulty Wiring faulty Adjust or replace drive belt Repair or replace cables Check ”ENGINE” fuse Replace fusible link Check charging system Repair wiring Check ”CHARGE” and ”IGN” fuses Replace ... alternator faulty Wiring faulty Adjust or replace drive belt Repair or replace cables Check ”ENGINE” fuse Replace fusible link Check charging system Repair wiring Check ”CHARGE” and ”IGN” fuses Replace ... ammeter. Standard amperage: 30 A or more If the ammeter reading is less than standard amperage, repair the alternator. (See page CH–6) HINT: With the battery fully charged, the indication will
Ngày tải lên: 29/04/2014, 09:57