he thong cua kinh tren toyota camry

NGHIÊN CỨU HỆ THỐNG ĐÁNH LỬA TRÊN TOYOTA CAMRY 2.5Q
... LỬA ĐỘNG CƠ XE TOYOTA CAMRY 2.5Q 2015 27 Giới thiệu động Toyota Camry 2.5Q 27 Giới thiệu hệ thống đánh lửa xe Toyota Camry 2.5Q 28 Nguyên lý hệ thống đánh lửa xe Toyota Camry 2.5Q ... trực tiếp sử dụng bơ bin đơi 26 Hình 1: Sơ đồ hệ thống đánh lửa xe Toyota Camry 28 Hình 2: Sơ đồ hệ thống đánh lửa Toyota Camry 30 Hình 3: Tín hiệu IGT IGF 32 Hình 4: Khi phát ... LỜI NĨI ĐẦU Trong năm gần đây, với phát triển kinh tế vượt bậc kinh tế giới nước và xu hướng kinh tế mở, hội nhập hóa tồn cầu ngày diễn liệt Kéo theo là phát triển ngành cơng nghệ tơ nói chung...
Ngày tải lên: 06/06/2022, 20:42

Khai thác kĩ thuật hệ thống gạt nước trên toyota camry
... Gạt nước theo tốc độ xe Rửa kính kết hợp gạt nước có chức ngăn đọng nước Gạt nước tự động trời mưa CHƯƠNG 2: HỆ THỐNG GẠT MƯA, RỬA KÍNH TRÊN TOYOTA CAMRY 2018 2.1 GIỚI THIỆU VỀ TOYOTA CAMRY 2.5Q ... thấp, không gian nội thất giữ nguyên Xe Camry 2018 Được phát triển dựa tảng kết cấu Toyota, Camry hệ công bố đem lại thoải mái ổn định cao cho người dùng Theo hãng xe Nhật Bản, mẫu sedan phân khúc ... D có trải nghiệm lái thú vị 2.2 THÔNG SỐ KỸ THUẬT XE TOYOTA CAMRY 2018 2.3 SƠ ĐỒ MẠCH ĐIỆN HỆ THỐNG GẠT NƯỚC MƯA, RỬA KÍNH TRÊN TOYOTA CAMRY 2.5Q 2018 K51(A),K52(B) Main Body ECU SW 3C R G L...
Ngày tải lên: 22/06/2023, 14:12

tiểu luận chủ đề hệ thống khung gầm trên toyota camry 2 5q 2023
... LIỆU THAM KHẢO 19Trang 4I.KHÁI QUÁT CHUNG1 Giới thiệu Camry 2.5Q 2023- Toyota Camry 2.5Q là phiên bản cao cấp nhất của dòng xe sedan cỡ trung củaToyota tại thị trường Việt Nam Chiếc xe này sở hữu ... 360 độ.Trang 8Toyota Camry 2.5Q và phiên bản Hybrid đều được trang bị 9 túi khí, cao nhấttrong các phiên bản Camry 2023.Ưu điểm nổi bật trong việc trang bị các tính năng an toàn xe Camry 2.5Q 2023chính ... động 8 cấp Ngoài ra, Camry 2.5Q 2023 còn có thiếtkế ngoại thất đẹp và sang trọng, nội thất rộng rãi và tiện nghi, hệ thống an toàn và tiếtkiệm nhiên liệu hiện đại.- Toyota Camry 2.5Q là loại xe...
Ngày tải lên: 17/06/2024, 14:02

Nghiên cứu khai thác bảo dưỡng và sửa chữa hệ thống làm mát trên ôtô camry 3 0 v6 của hãng toyota
... không khí Không thuận tiện sử dụng động vïng hiÕm níc 1.3 Giíi thiƯu xe Toyota – Camry 3.0V Camry 3.0V Xe Camry 3.0V6 cña h·ng Toyota model xe hàng đầu hÃng nói riêng thị trờng ôtô Việt nam nói chung ... động để nóng lên nhanh chóng Khi động đà nóng lên, thermostat mở cho phép nớc làm mát chảy qua tản nhiệt - Thermostat van vận hành theo nhiệt độ Thermostat đợc đặt đờng rÃnh dung dịch làm mát nắp ... dỡng sửa chữa ngày tăng Trong hoàn cảnh kinh tế nớc ta nay, sử dụng ôtô đạt hiệu kinh tế cao, an toàn điều cần thiết; đảm bảo đủ cho nhu cầu cấp thiết kinh tế mà tạo nên vị quan trọng phơng thức...
Ngày tải lên: 21/07/2023, 12:56
Toyota camry hybrid xv50 2012 2017 windshield he thong cua kinh
... OPERATION CHECK B140183 CHECK WINDOW LOCK SWITCH (a) Check that the front passenger side power window and rear power windows operation are disabled when the window lock switch of the power window ... If the result is not as specified, there may be a malfunction in the wire harness (c) Reconnect the M1 switch connector and reset the power window motor (d) Measure the voltage according to the ... If the result is not as specified, there may be a malfunction in the wire harness (c) Reconnect the H6 switch connector and reset the power window motor (d) Measure the voltage according to the...
Ngày tải lên: 10/11/2023, 10:37
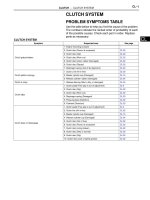
Toyota camry 2006 2011 clutch hệ thống ly hợp trên toyota camy đời 2006 2011
... CLUTCH PEDAL HEIGHT (a) Turn back the floor carpet. (b) Check the pedal height. Pedal height from asphalt sheet: 148.0 to 158.0 mm (5.8268 to 6.2205 in.) If necessary, adjust the pedal height. (c) ... point) If the distance is not as specified, perform the following operations: • Check the pedal height. • Check push rod play and pedal free play. • Bleed the clutch line. • Check the clutch ... ASSEMBLY (a) Check that the engine does not start when the clutch pedal is released (b) Check that the engine starts when the clutch pedal is fully depressed If necessary, replace the clutch...
Ngày tải lên: 24/05/2014, 13:28

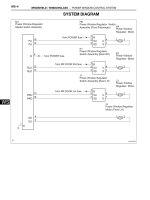
Tài liệu hệ thống common rail trên toyota prado
... (SCV) z The supply pump is equipped with a normally closed type SCV z When the solenoid is energized, the needle valve is pressed upon (in the compact SCV, the cylinder is pulled upon) by the armature, ... outline • The difference between the final injection quantity and the actual injection quantity are learned based on the loop in the figure below Next, the following two items are compared: 1) the results ... opening the fuel passage and supplying fuel to the plunger (Total quantity suctioned → Total quantity discharged) z When power is removed from the solenoid, the return spring presses the needle...
Ngày tải lên: 04/06/2021, 09:25

Hệ thống phanh ABS trên Toyota Innova 2.0e
... loại ABS: II - Hệ thống phanh ABS Toyota Innova…………………………… 2.1 Giới thiệu xe Toyota Innova 2.0 E (2010)…………………………8 2.2 Cấu tạo phanh ABS Toyota Innova 10 2.2.1 Cảm biến tốc độ ... ABS: a) Phân loại theo chất tạo áp suất phanh: + Phanh khí + Phanh thủy lực b) Phân loại theo cách bố trí cảm biến: Van ều ển C ảm biến I, II m ạch dẫn động phanh c) Phân loại theo chấp hành: + ... điện vị trí có van khí + Van điện vị trí II - Hệ thống phanh ABS Toyota Innova 2.1 Giới thiệu xe Toyota Innova 2.0 E (2010 ) Toyota DxRxC Chiều dài sở Chiều rộng sở (Trước/ sau) Khoảng sáng gầm...
Ngày tải lên: 11/12/2021, 08:47

Đồ án thiết kế hệ thống làm mát trên toyota vios 2014
... VÀ NGUYÊN LÝ LÀM VIỆC CỦA HỆ THỐNG LÀM MÁT TRÊN XE TOYOTA VIOS 2014 28 2.1 Giới thiệu xe Toyota Vios 2014 28 2.2 Hệ thống làm mát xe toyota vios 2014 32 2.2.1 Sơ đồ nguyên lý ... LIỆU THAM KHẢO 57 Danh mục bảng Bảng 2.1: Thông số kỹ thuật xe Toyota Vios 2014 30 Bảng 2.2: Thông số kỹ thuật xe Toyota Vios 2014 31 Danh mục hình ảnh Hình 1.1: Sơ đồ hệ thống làm ... nghề kinh tế quốc dân như: khai thác tài nguyên, dịch vụ công cộng, xây dựng, quân đặc biệt nhu cầu di chuyển ngày cao người Một ô tô đại ngày phải đáp ứng nhu cầu tính tiện nghi, an toàn, kinh...
Ngày tải lên: 16/03/2022, 13:27

NGHIÊN CỨU HỆ THỐNG KHỞI ĐỘNG TRÊN TOYOTA VIOS 2018
... Xe Toyota Vios 2018 ……………………………………………… 43 Hình Doanh số bán xe Toyota Vios tháng 1/2018 44 Hình 3 Cơng nghệ van biến thiên VVT-I xe Toyota Vios 2018 44 Hình Bảng thơng số kỹ thuật xe Toyota ... HỆ THỐNG MÁY KHỞI ĐỘNG TRÊN XE TOYOTA VIOS 2018 43 3.1 Giới thiệu chung toyota vios 2018 43 3.2 Cấu tạo, hoạt động hệ thống máy khởi động động 1NZ-FE xe Toyota Vios 46 3.2.1 ... xe TOYOTA VIOS Từng phận phân tích rõ ràng Trong trình thực đề tài em kết hợp kinh nghiệm thực tiễn, lý thuyết vễ sữa chữa ô tô để cố gắng cập nhật kiến thức Nhằm đáp ứng yêu cầu sữa chữa xe TOYOTA...
Ngày tải lên: 05/06/2022, 23:22

NGHIÊN CỨU HỆ THỐNG KHỞI ĐỘNG TRÊN TOYOTA VIOS 2016
... NGUYÊN LÝ HOẠT ĐỘNG CỦA HỆ THỐNG KHỞI ĐỘNG TOYOTA VIOS 2016 11 2.1 Giới thiệu xe Toyota Vios 2016 11 2.2 Cấu tạo thành phần hệ thống khởi động xe Toyota Vios 2016……… 14 2.2.1 ... động 43 LỜI NÓI ĐẦU Nước ta trình hội nhập phát triển với kinh tế giới, kinh tế phát triển mạnh mẽ, với phát triển kinh tế nhu cầu đời sống nói chung phương tiên lại, vận chuyển nói ... kiểu đấu dây máy khởi động Hình 2.1: Xe Toyota Vios 2016 11 Hình 2.2: Trang bị hệ thống phanh ABS 12 Hình 2.3: Máy khởi động xe Toyota Vios 2016 14 Hình 2.4:Khóa điện...
Ngày tải lên: 29/06/2022, 21:58

Toyota camry 2006 2011 windshield windowglass hệ thống cửa kính trên toyota camry đời 2006 2011
... in.) away from the position where it contacted the check jig (4) While the door glass is going down, verify that the window switch can not be used to make the glass go up (b) Check the reversing ... When the door glass is closed using AUTO or MANUAL operation, check that the door glass goes down after contacting the check jig The door glass should go 80 to 100 mm away from the position where ... between the tester and vehicle begins CHECK DTC OUTPUT (a) Turn the ignition switch off (b) Wait for at least 10 seconds, and then turn the ignition switch on (IG) (c) Check whether the DTC output...
Ngày tải lên: 24/05/2014, 13:53
GW hệ THỐNG cửa KÍNH TRÊN NISSAN VERSA SEDAN 2012
... Interview the customer if possible, to determine the conditions that exist when the noise occurs Use the Diagnostic Worksheet during the interview to document the facts and conditions when the noise ... relates to the symptom, follow the procedure to repair the noise LOCATE THE NOISE AND IDENTIFY THE ROOT CAUSE Narrow down the noise to a general area To help pinpoint the source of the noise, use ... points SEATS When isolating seat noise, it's important to note the position the seat is in and the load placed on the seat when the noise is present These conditions should be duplicated when verifying...
Ngày tải lên: 12/04/2014, 16:10
GW hệ THỐNG cửa, KÍNH TRÊN INFINITI FX35, FX45 2003
... Interview the customer if possible, to determine the conditions that exist when the noise occurs Use the Diag- H nostic Worksheet during the interview to document the facts and conditions when the noise ... important to note the position the seat is in and the load placed on the seat when the noise is present These conditions should be duplicated when verifying and isolating the cause of the noise Cause ... relates to the symptom, follow the procedure to repair the noise LOCATE THE NOISE AND IDENTIFY THE ROOT CAUSE q q q q q Narrow down the noise to a general area To help pinpoint the source of the noise,...
Ngày tải lên: 13/04/2014, 16:36
Toyota camry 2006 2011 2AZ FE starting hệ thống khởi động trên toyota camry 2AZ FE đời 2006 2011
... Connect the battery and an ammeter to the starter as shown in the illustration (4) Check that the starter rotates smoothly and steadily with the clutch pinion gear extended Check that the ammeter ... replace the starter commutator end frame assembly (b) Check the resistance (1) Using an ohmmeter, measure the resistance between the positive (+) and negative (-) brushes Resistance: 10 kΩ or higher ... the starter commutator end frame rubber with the groove of the starter yoke assembly (b) Install the starter commutator end frame assembly to the starter yoke assembly NOTICE: The magnet of the...
Ngày tải lên: 23/05/2014, 16:53
Toyota camry 2006 2011 2GR FE starting hệ thống khởi động trên toyota camry 2GR FE đời 2006 2011
... are for the indicator lights The driver can check the present power source mode and whether the engine can start in accordance with the illumination state of the indicator light • When the main ... appears on the screen NG Go to step OK CHECK ENGINE SWITCH CONDITION (a) Check the power source mode change (1) When the key is inside the vehicle and the shift lever is in the P position, check that ... appears on the screen NG Go to step OK CHECK ENGINE SWITCH CONDITION (a) Check the power source mode change (1) When the key is inside the vehicle and the shift lever is in the P position, check that...
Ngày tải lên: 24/05/2014, 13:08
Toyota camry 2006 2011 air conditioning hệ thống điều hòa trên toyota camry 2GR FE đời 2006 2011
... them to the intermediate layer neurons Based on this data, the intermediate layer neurons adjust the strength of the links among the neurons The sum of these is then calculated by the output ... operate the ignition switch, any other switches, or the doors HINT: Connect the cable of the intelligent tester to the DLC3, turn the ignition switch on (IG) and attempt to use the tester If the display ... side of the piston becomes the same as the pressure that is applied to the right side of the piston Thus, the spring elongates and eliminates the tilt of the swash plate As a result, there is...
Ngày tải lên: 24/05/2014, 13:13

Toyota camry 2006 2011 drive shaft hệ thống truyền động trên toyota camry đời 2006 2011
... ASSEMBLY (a) Check that there is no excessive play in the outboard joint (b) Check that the inboard joint slides smoothly in the thrust direction (c) Check that there is no excessive play in the radial ... ASSEMBLY (a) Check that there is no excessive play in the outboard joint (b) Check that the inboard joint slides smoothly in the thrust direction (c) Check that there is no excessive play in the radial ... WHEEL REMOVE FRONT AXLE HUB NUT (a) Using SST and a hammer, release the staked part of the front axle hub nut SST 09930-00010 NOTICE: Loosen the staked part of the nut completely, otherwise the...
Ngày tải lên: 24/05/2014, 13:30
Toyota camry 2006 2011 exterior hệ thống ngoại thất trên toyota camry đời 2006 2011
... cleaner (b) Clean the name plate (If reusing the name plate) (1) Using a heat light, heat the name plate (2) Remove the double-sided tape from the name plate (3) Wipe off any tape adhesive residue ... cleaner (b) Clean the name plate (If reusing the name plate) (1) Using a heat light, heat the name plate (2) Remove the double-sided tape from the name plate (3) Wipe off any tape adhesive residue ... tape to the name plate (c) Install the name plate (1) Using a heat light, heat the vehicle body and name plate (2) Remove the release paper from the name plate HINT: After removing the release...
Ngày tải lên: 24/05/2014, 13:37

Toyota camry 2006 2011 lighting hệ thống chiếu sáng trên toyota camry đời 2006 2011
... DESCRIPTION The main body ECU receives a light control switch HEAD signal from the headlight dimmer switch assembly, and turns the low beam headlights on The headlight relay is installed in the power ... to the HIGH position (c) Check if the high beam headlight LH illuminates (d) Turn the dimmer switch to the LOW position (e) Install the H-LP (RH) fuse and remove the H-LP (LH) fuse (f) Turn the ... occurred, there is a problem either with the vehicle or with the tester HINT: • If communication is normal when the tester is connected to another vehicle, inspect the DLC3 of the original vehicle • If...
Ngày tải lên: 24/05/2014, 13:43