2 các mẫu hạt nhân

Tài liệu Các Mẫu Thiết Kế Toàn tập part 2 pdf
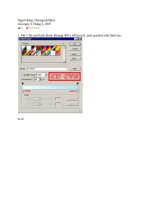
... in your brushes Create a new document sized 1000×500 pixels with all the default settings, RGB, 72 dpi, white background etc (in the future for this tutorial we will create a couple of new documents ... something like this: Then go to Edit > Define Brush Preset again and save this brush as Flower _2 Create a new one document and make new brush prints: Ok, now I would like to review more brush...
Ngày tải lên: 15/12/2013, 02:15

Tài liệu Các Mẫu Thiết Kế Toàn tập part đầu pptx
... chọn công cụ pen tool fill màu đen nơi nơi mà bạn đặt cỏ lên phía Step - Duplicate the Grasses: Nhân đôi layer cỏ bạn nên xén cỏ công cụ tẩy đường tẩy ngang không bạn kiếm loại cỏ loại cỏ Nhật ... Step 10 - Drawing the Clouds: Tạo layer Vẽ lên số chấm brush mềmcó kích cõe 300px đătk opaccitu 10 >20 % Optional: Cuối thêm vào bảng phong thân hay bia mộ hay nhà cửa đảo tùy bạn ...
Ngày tải lên: 15/12/2013, 02:15

Tài liệu Các Mẫu Thiết Kế Toàn tập part 1 pdf
... to draw a selection like this: Fill selection with white color in a new layer Adjust Opacity 10, 20 % and use Blur tool to make opaque sides of selection Change blending mode: Screen, create a layer ... and Vector Mask Hides Effect: Create a new layer mask, gradient from white to black, adjust 10 ,20 % and apply this step to P layer too Use Single pixel Rectangle Marquee tool to make line like...
Ngày tải lên: 15/12/2013, 02:15


Tài liệu Các Mẫu Thiết Kế Toàn tập part 5 ppt
... And you'll have this result : STEP 2: Download and load this brush into your photoshop : Land_brush Choose any "island" inside this ... layer" Pick Eliptical Marquee Tool Make an eliptical selection : Fill this selection with color #12a80d Continue making creat new layer and fill selection like this : Result : STEP 3: Download and...
Ngày tải lên: 24/12/2013, 10:18

Tài liệu Các Mẫu Thiết Kế Toàn tập part 6 ppt
... And you'll have this result : STEP 2: Download and load this brush into your photoshop : Land_brush Choose any "island" inside this ... layer" Pick Eliptical Marquee Tool Make an eliptical selection : Fill this selection with color #12a80d Continue making creat new layer and fill selection like this : Result : STEP 3: Download and...
Ngày tải lên: 24/12/2013, 10:18
Tài liệu Các Mẫu Thiết Kế Toàn tập part 7 doc
... (Create new layer) we’ll choose again the Brush Tool (B) to draw a diagonal line, which color is # 821 F06 Insert now on the picture the preliminarily cut out CD The disk’s layer has the parameters ... Filter>Noise>Add noise This layer must be also placed lower than the CD’s layer: The layer’s parameters: Fill 20 % Blending mode-Soft light Next we’ll represent a lot of musical notes, using for this operation...
Ngày tải lên: 24/12/2013, 10:18
Tài liệu Các Mẫu Thiết Kế Toàn tập part 8 doc
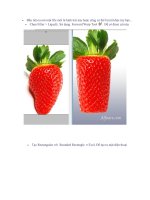
... chọn vùng mà khoan tròn • Fill màu vào Apply Rainbow Gradient Overlay to this layer Opacity • • • Nhân đôi layer Thiết lập chế độ Gradient Overlay mà bạn thích ví dụ chọn Tạo vùng chọn hình bán ... hình • Tạo hiêu ứng shadow cho bóng sáng chinh opactuty 35% • Chọn Filter > Blur > Gaussian Blur (25 ) Hợp tất lại ctrl+ship+E Thêm thắt chút ta And here is the result! Strawberry Cell Phone Phù...
Ngày tải lên: 24/12/2013, 10:18
Tài liệu Các Mẫu Thiết Kế Toàn tập part 9 ppt
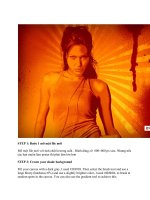
... http://www.sxc.hu/photo/1 020 017 http://www.sxc.hu/photo/315179 http://www.sxc.hu/photo /23 327 9 http://www.sxc.hu/photo/187500 http://www.sxc.hu/photo/64 826 7 http://www.sxc.hu/photo/48 627 7 http://www.sxc.hu/photo/805174 ... http://www.sxc.hu/photo/48 627 7 http://www.sxc.hu/photo/805174 http://www.sxc.hu/photo/189 425 http://www.sxc.hu/photo/1 727 24 Bước 3: Đầu tiên bạn cầm lấy công cụ Pen Tool, dùng kỹ sử dụng pen tool bạn khoanh ... [endif] > Bước 11: tíêp tục sang pic nhé, bạn lại khoanh vùng trọn, tương tự rùi Ctrl + T ^_^ Bước 12: Bây xử lý phần hậu cảnh, bạn tô đen layer Background vào Filter > Filter - Render - Clouds Apply...
Ngày tải lên: 24/12/2013, 10:18
Tài liệu Các Mẫu Thiết Kế part 10 doc
... below: Drop sadow: color #4F372C Inter Shadow: color #4F372C Outer Glow: color #ECD12D Inter Glow: color #2F4C97 Bevel and emboss Contour 10 Satin 11 Color Overlay 12 Pattern Overlay: click in ... and flow 90% in layer box Duplicate layer ellipse and put it on butterfly layer then set opacity 32% and flow 50% This is my final result Another result ...
Ngày tải lên: 24/12/2013, 10:18
Tài liệu Các Mẫu Thiết Kế part 11 docx
... 2 Dùng công cụ Pen vẽ tô màu hình sau : http://i140.photobucket.com/albums/r31/daoanhdung/tut2/3.jpg Dùng Pen làm tương tự để có vùng mây chồng ... Convert Point Tool), ta có : Dùng Pen tool vẽ đuôi sao, tạo layer đôi of tô màu (có thể tô màu : #29 758d #alf8ff, ta có kết hình sau : Mở lại Shape Tools, chọn Shape hình sau : chọn màu trắng, tạo...
Ngày tải lên: 24/12/2013, 10:18


Tài liệu Các Mẫu Thiết Kế Toàn tập part pptx
... t thực " gau blur" iãn ưới ta n ta dc kết qu uả Step : l ống % giảm fill cho layer " Tròn "xuố 2% Step : kì h ũng ôi he đưa bất k hình vào cũ dc tô chọn đội bóng yê thích heh Barcel lona ác ức...
Ngày tải lên: 21/01/2014, 16:20

Tài liệu Các Mẫu Thiết Kế Toàn tập part 13 doc
... Gaussian Blur, chọn 10 pixels Cái tuỳ bạn Nhân đôi layer Trang, Filter > Blur > Motion Blur, tuỳ bạn để chọn Angle cho phù hợp Tham khảo FF chọn 45, Distance 27 0 7 Như vậy, bạn thấy Layer 1, Trang...
Ngày tải lên: 21/01/2014, 16:20
Tài liệu Các Mẫu Thiết Kế Toàn tập part 14 docx
... used along with their gradient Locations (right to left): #7b0300 at 0%, #a00000 at 2% , #ff7e00 at 38%, #f7ff2a at 100% STEP 11: Add Border Shadow Create a new layer Then Select All (ctrl+A) and ... (this option can be found in the top of the layers window) Then select the ‘Registration Target 2 shape from your default custom shapes This is the shape which resembles sun rays Make sure the ... settings and make sure the color is Black: Then go to Filter>Blur>Gaussian Blur and set the radius to 42. 0 pixels Change the Opacity of this layer to 56% You are done! I added text and some more simple...
Ngày tải lên: 21/01/2014, 16:20

Tài liệu Các Mẫu Thiết Kế Toàn tập part 15 docx
... a black color like on a picture below: Press Ctrl+D to deselect chosen area and set up fill of 20 % for this layer, then duplicate it with Layer > Duplicate layer Now, head into the Blending Options ... ‘Kung Fu Panda’ on two lines For ‘Kung Fu’ use color of # eb3d1f and for ‘Panda’ use this one # ffcb20 It will be more interesting to warp text like this: Go to type layer with ‘Kung Fu’ and apply ... Tool, then select an area, feather selection using Select > Modify > Feather (Feather Rarius of 12 pixels) Then delete shadow inside the selection and press Ctrl+D to deselect chosen area Set...
Ngày tải lên: 21/01/2014, 16:20

Tài liệu Các Mẫu Thiết Kế Toàn tập part 16 pptx
... 55, Saturation to 30, Lightness to Go to Image > Adjustments > Levels Set the values to 0,0.85 ,25 5 Step - Defining Pattern: Open up the Hello Kitty PSD file you downloaded earlier Hide all other...
Ngày tải lên: 21/01/2014, 16:20

Nghiên cứu vấn đề bảo đảm an toàn và an ninh hệ thống thông tin của cục an toàn bức xạ và hạt nhân
... Modem Internet: 21 0 .24 5.63. 120 /29 VARANS03 Firewall/Proxy 1 92. 168.1.100 VARANS01 E-Mail Server 1 92. 168.1 .2 VARANS 02 Files/DNS/DHCP 1 92. 168.1.3 Mng LAN VARANS Cisco Firewall 1 92. 168.1 .25 2 Ngi dựng ... tin ny 2. 1 .2 i th cnh tranh: i th cnh tranh: 2. 1.3 Giỏn ip: Giỏn ip (Spy): 2. 1.4 Hacker: Hacker: 2. 1.5 Ngi tũ mũ (Explorer): Ngi tũ mũ (Explorer): 2. 1.6 Script Kiddie: Script Kiddie: 2. 1.7 K ... (70 TH) 10.1 .2. x Vn phũng (Linh Lang) 10.1.3.x Mỏy in mng 10.1.x. [21 -50] Access Point 10.1.x.[51-60] Gateway Router 10.1.x. [25 0 -25 4] Dnh cho mỏy tớnh trm (wifi, VPN) 10.1.x.[100 -24 9] Dnh riờng...
Ngày tải lên: 17/02/2014, 09:01
Tìm hiểu các kiểu đột biến liên quan đến sự kháng fluoroquinolone ở vi khuẩn lao và xác định nhanh vi khuẩn lao kháng fluoroquinolone bằng kỹ thuật real time pcr thông qua đột biến gene gyr
... (1995-1997) đến 22 ,2% (1998 -20 00) giảm xuống 18 ,2% (20 01 -20 03) (64) Tại Thượng Hải, Trung Quốc, đột biến gene gyrA tìm thấy 1,9% (5 /25 7) chủng nhạy với thuốc kháng lao hàng thứ (H, R, S, E) 25 ,1% (44/175) ... Việt Nam xếp hạng thứ 12 22 nước có dịch tễ lao cao theo báo cáo WHO năm 20 08 (68) Theo đó, tỷ lệ lao Việt Nam ước tính 173/100.000 dân/năm; tỷ lệ lao lưu hành ước tính 22 5/100.000 dân/năm; tỷ ... kháng FQ tối ưu Hình 2. 2 Sơ đồ phát triển đánh giá phản ứng real-time PCR phát đột biến kháng fluoroquinolone Chương – VẬT LIỆU VÀ PHƯƠNG PHÁP - Trang 36 - 2. 2 Nguồn mẫu 2. 2.1 Các chủng kháng...
Ngày tải lên: 08/10/2014, 18:48

Siêu tầm các mẫu đồng hồ lồng vào point để tính thời gian.
Ngày tải lên: 24/07/2013, 01:25