Autodesk Revit Architecture 2011 No Experience Required - part 8 ppt

Autodesk Revit Architecture 2011 No Experience Required - part 8 ppt
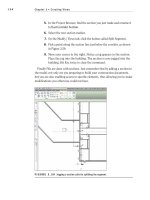
... 16. From the top of that wall, draw another wall to the left 80 ′. 17. Draw a wall down 25 ′. 18. On the Modify | Place Wall panel, click the Start-End-Radius Arc button, as shown in Figure ... offset the alignment line down. Your plan should now look like Figure 2.5. TIP Notice you did not actually use the Offset command. Revit Architecture has the offset function built into most...
Ngày tải lên: 07/07/2014, 07:20

Autodesk Revit Architecture 2011 No Experience Required - part 6 ppt
... (Building Elevation) cat- egory. Double-click on South. 8. Also in the Project Browser, notice there is a 3D Views category. Expand the 3D Views category, and double-click on the {3D} choice. ... Now click and hold Rewind in the steering wheel. You can now find an older view, as shown in Figure 1. 38. FIGURE 1. 38 Because Revit does not include zoom commands in the Undo function, you...
Ngày tải lên: 07/07/2014, 07:20
Autodesk Revit Architecture 2011 No Experience Required - part 15 ppt
... bubble. NOTE Notice that when you are adjusting the levels in the section the 2D icon appears. This means that any adjustments made here will not affect any other views. In a sectional view, Revit ... right-click on Section 1. 2. Choose Rename from the context menu (see Figure 3. 38) . 3. Change the name of Section 1 to West Corridor Section. FIGURE 3. 38 You can rename the view by...
Ngày tải lên: 07/07/2014, 07:20
Autodesk Revit Architecture 2011 No Experience Required - part 17 pptx
... Luckily in Revit Architecture, callouts are not only easy to add to your model but they directly link to the view they refer to as well. This is crucial for project coordination. Another nice ... scale. Yes, your call- out can be at a different scale. To follow along, open your model, or go to www.sybex.com/go /revit2 011ner and browse to Chapter 3. Open the file called NER-09.rvt. If y...
Ngày tải lên: 07/07/2014, 08:20
Autodesk Revit Architecture 2011 No Experience Required - part 19 ppt
... to follow along. If you have not com- pleted the previous chapter procedures, open the file caller NER-11.rvt found at the book’s website, www.sybex.com/go /revit2 011ner. Go to the Chapter 4 ... with the edit commands. NOTE Like the previous chapters, it is important that you are com- fortable with this chapter. If you are not comfortable with the first few chap- ters, I recommend skimmin...
Ngày tải lên: 07/07/2014, 08:20

Autodesk Revit Architecture 2011 No Experience Required - part 24 pptx
... Press Esc. 8. Select the new dimension. 9. In the Modify dimensions Properties dialog, select the Linear - 3/32 ″ Arial - 1/4 ″ style, as shown in Figure 5. 18. 10. The dimension is now rounded ... corridor area. 2. On the Annotate tab, select the Linear Dimension button. Notice that you cannot select the entire wall. That option has been taken away. Instead, Revit requires...
Ngày tải lên: 07/07/2014, 08:20

Autodesk Revit Architecture 2011 No Experience Required - part 35 ppt
... 7. 38. 3. On the Properties panel select Exterior - Brick And CMU On MTL. Stud (No Parapet), as shown in Figure 7. 38. FIGURE 7. 38 Changing the walls to Exterior - Brick And CMU On MTL. Stud (No ... have no idea where the view is extended to. Is it to the end of the building? You just don’t know. If you pick the elevation arrow (the part of the elevation marker),...
Ngày tải lên: 07/07/2014, 08:20

Autodesk Revit Architecture 2011 No Experience Required - part 36 pptx
... canopy roof. The walls are now joined to the roof, as shown in Figure 7. 58. FIGURE 7. 58 The walls are now attached to the roof. All of the conventional roofing systems have been added. It is now ... • Roofs 3 28 FIGURE 7.59 Selecting the roof to be modified You are now in the Sketch Mode for this roof. It is time to start modifying this roof. This procedure is reminiscent of climb- ing up...
Ngày tải lên: 07/07/2014, 08:20

Autodesk Revit Architecture 2011 No Experience Required - part 43 pptx
... (see Figure 9. 28) . FIGURE 9.27 Modifying the dimensions of the 6 1 /8 wall Creating Ceiling Openings and Soffits 403 FIGURE 9. 28 Setting the Top Constraint and Bottom Offset You are now ready to ... Finish Edit Mode. You now have a plan region. Although it may not seem as though you did any- thing in the plan, when you place a ceiling at 14 ′–6″, you will be able to see it. NOTE The dot...
Ngày tải lên: 07/07/2014, 08:20

Autodesk Revit Architecture 2011 No Experience Required - part 45 pptx
... to Level 1 ceiling plan. (Notice that we are going to a ceiling plan right now, not a floor plan.) Of course the sink will come in at the wrong rotation. By now you know that you can tap the ... just fit, but this is not a perfect world! 1. Copy the toilet to the right 6 -2 1/2″. 2. On the Home tab, select the Place A Component button. 3. Select Toilet Stall-Braced-3D : 32″ × 56″ Cle...
Ngày tải lên: 07/07/2014, 08:20
- autodesk revit architecture 2011 no experience required part 1 pot
- autodesk revit architecture 2011
- autodesk revit architecture 2011 activation code
- autodesk revit architecture 2011 free download full version
- autodesk revit architecture 2011 keygen free download
- autodesk revit architecture 2011 serial number product key
- autodesk revit architecture 2011 download
- autodesk revit architecture 2011 serial number
- autodesk revit architecture 2011 keygen