the bridge or switch with the lo

49 so do mach dien oto 2001 manual 3 sedan
... engage the locks > Either unlock the doors together with the button for the central locking system and then pull each of the release handles above the armrests or > pull the release handle for each ... properly locked.< > To open: with the door closed, turn the key to the "Unlock" position and hold it > To close: with the door closed, turn the key to the "Lock" position and hold it Watch during the ... Both the door locks and the safety lock buttons remain locked The alarm system is also armed or disarmed 460de006 The concept Using the key One turn of the key in the driver's door lock unlocks the...
Ngày tải lên: 25/12/2013, 09:11

52 so do mach dien oto 215651 shop manual xe o to MERCEDES SPRINTER
... 05.08 For proper adjustment and to prevent unnecessary load on the locking device OR IGI NAL Bring the sliding door manually to almost closed position and then slowly pull inward the door till the ... Connect the (yellow/black wire) to the electric motor plug as seen in the picture take out from wire set (–) yellow(+ In case the second “click” is not heard turn the screw one turn counterclockwise ... (LONG) Ø4 9mm Ø3.5mm 03.08 ELECTRIC SLIDING DOOR MERCEDES SPRINTER, VOLKSWAGEN CRAFTER Page OR IGI NAL REMOVE ORIGINAL STOPPER REMOVE ORIGINAL BOLT REMOVE ORIGINAL COVER LOCATE TEMPLATE ON ORIGINAL...
Ngày tải lên: 25/12/2013, 09:11

53 so do mach dien oto 215653 REPAIR MANUAL xe o to volkswagen passat
... Calculating the direction of travel: 45 - Anti-lock brake system Anti-locking Brake System (ABS) and Anti-locking Brake System with Electronic Differential Lock (ABS/EDL) Teves 04 Notes for repair work ... 11 of 82 40-11 Reworking cap nut in side member (Base and Plus suspension) If the threads of the cap nut in the side member are damaged, the thread must either be retapped or the cap nut must ... 40-15 - Self-locking nut, 265 Nm (195 ft lb) Only loosen and tighten with the vehicle standing on its wheels (danger of accident) Any paint residue and /or corrosion on the thread of the outer joint...
Ngày tải lên: 25/12/2013, 09:11

58 so do mach dien oto 216094 xe o to ford sierra phan service and re
... people with heart problems or a pacemaker Don’t work on or near the ignition system with the engine running or the ignition switched on Warning: Never expose the hands, face or any other part of the ... slide the belt over the pulleys, then lever the alternator away from the cylinder block until the correct belt tension is achieved Lever the alternator using a plastic or wooden lever at the pulley ... not, loosen the locknut and adjust the ball-pin position accordingly by turning the adjuster nut, then tighten the locknut (see illustrations) Allowance must be made for tightening the locknut,...
Ngày tải lên: 25/12/2013, 09:12


61 so do mach dien oto renault 19 service manualMR293R190
... FROM THE REAR Apply the handbrake or place chocks under the rear wheels It is FORBIDDEN to lift the rear of the vehicle taking the load under the rear axle Lift each wheel separately taking the load ... : the vehicle type, At : the first number indicates the gearbox or the factory options the second number indicates the level of equipment, At : the technical equipment number, At : the factory ... removed Change the belt if the tension is below the minimum operating tension Small cuts or cracks are not criteria for changing the belt For the measuring point, fit the sensor of Mot 1273 in...
Ngày tải lên: 25/12/2013, 09:12

Sơ đồ mạch điện xe ô tô Ford - Taurus 1997.pdf
... Anti-lock Brake Circuits 1997 Ford Taurus LX Page Copyright © 2002 MRIC, LLC 1997 System Wiring Diagrams Ford - Taurus PAVLIN Sunday, November 27, 2005 08:07PM Fig 4: Anti-theft Circuit 1997 Ford ... Circuit, W/O DRL 1997 Ford Taurus LX Page 41 Copyright © 2002 MRIC, LLC 1997 System Wiring Diagrams Ford - Taurus PAVLIN Sunday, November 27, 2005 08:07PM Fig 42: Horn Circuit 1997 Ford Taurus LX Page ... Wiring Diagrams Ford - Taurus PAVLIN Sunday, November 27, 2005 08:07PM Fig 5: Body Computer Circuits 1997 Ford Taurus LX Page Copyright © 2002 MRIC, LLC 1997 System Wiring Diagrams Ford - Taurus...
Ngày tải lên: 23/08/2012, 11:28

Sơ đồ mạch điện xe ô tô Ford Explorer 1996.pdf
... 1996 Ford Explorer For x Copyright © 1998 Mitchell Repair Information Company, LLC Monday, October 04, 2004 09:51AM SYSTEM WIRING DIAGRAMS Anti-lock Brake Circuits (p 3) 1996 Ford Explorer For x ... 1996 Ford Explorer For x Copyright © 1998 Mitchell Repair Information Company, LLC Monday, October 04, 2004 09:52AM SYSTEM WIRING DIAGRAMS Exterior Lamps Circuit (p 21) 1996 Ford Explorer For x ... 1996 Ford Explorer For x Copyright © 1998 Mitchell Repair Information Company, LLC Monday, October 04, 2004 09:52AM SYSTEM WIRING DIAGRAMS Overhead Console Circuit (p 34) 1996 Ford Explorer For...
Ngày tải lên: 23/08/2012, 11:28

Tài liệu của Ford Fiesta - sơ đồ mạch điện Fies
... FrontWiperWasherSwitch C4-3 D-E FrontWiperParkSwitch C7-5 G-I UnlockSwitchDrv C3-7 C-M UnlockDrvDoorMotor E-E LightsOffSw C5-3 D-I LowBeamRly C4-5 E-B LowBeamSw C5-13 C5-21 E-R VehicleHornSw D-X PosLampLF ... S1CBP07 26 SENSOR - AMBIENT TEMP F06-2 F01-2 F1out Mini 7.5A F18out Mini 7.5A F18-1 F7out Mini 10A C1-24 Evaporator Sensor Gnd 24 GN-BU F17-1 F1in F17out Mini 15A C1-26 Evaporator Sensor 26 CDC32_C2DC32 ... Rly3-PCM Out(5) Rly3-PCM CoilOut(2) Rly3-PCM CoilIn(1) F27out Mini 7.5A/10A Rly13-HeaterBlower Out(5) Rly13-HeaterBlower CoilOut(2) Rly13-HeaterBlower CoilIn(1) Rly13-HeaterBlower In(3) F4out Jcase...
Ngày tải lên: 20/10/2012, 09:58

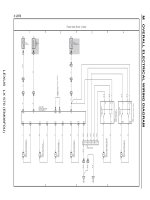
Bản vẽ sơ đồ mạch điện xe ô tô LEXUS LX 570 - P1
... LP 20A FR DOOR LH 10A A/C IG 20A FR DOOR RH 10A ECU–IG No 25A DOOR NO IG1 NO Relay 15A RR WIPER 20A RR DOOR LH W–B G 20A WSH 20A RR DOOR RH 30A WIPER 62 2D W–B E E62 Junction Connector W–B LEXUS ... Connector BR 10A IGN E67 Junction Connector 1B 5A MET 10A INJ B B W–B GND 1B E B B B 1B G Free B IG1 NO Relay < 29–1> SS2 GND SS1 Full Traveling G SS2 EFI Relay D E59 Junction Connector E18 Engine Switch ... 15A HEAD RH R 15A HEAD LL L HEAD LO Relay 1 22 ACCD A 15A HEAD RL L L 1 79 1 W W W 69 L–B 78 W G A AM1 17 SSW1 A B B AM2 16 SSW2 A B P 67 97 87 E59 Junction Connector 77 1C 1B 75 EA1 B 11 B IG2D...
Ngày tải lên: 22/10/2012, 15:23

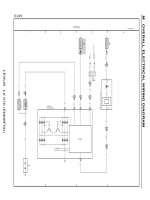
Bản vẽ sơ đồ mạch điện xe ô tô LEXUS LX 570 - P2
... K41(C) Junction Connector W–B L CANL B V B L 15 BR 19 A L P 14 20 A B 13 L E68 Junction Connector 12 A L A Y L W AE3 L L L 12 Y P 16 L E74 Junction Connector F21 Junction Connector 14 L 2 SB 13 E71 ... Junction Connector L Y L L LEXUS LX 570 (EM08F0U) B CANH C CANL 10 FE4 A E11 Steering Sensor 20 C 10 A Y A V CANH E84(C) Steering Control ECU A24(A) Skid Control ECU with Actuator Assembly CANL ... Power Back Door Unit Assembly L33(A) No Multiplex Network Body ECU R CANN 15 C 12 15 13 R A A C C D D E E B B Y 73 EL1 E73 Junction Connector R LG R R FE7 FE7 MPX+ CANH E6 Option Connector (Bus Buffer)...
Ngày tải lên: 22/10/2012, 15:23

Bản vẽ sơ đồ mạch điện xe ô tô LEXUS LX 570 - P3
... Connector G 44 L J6 Rear Door Lock Assembly RH E L 41 EL1 B ILL+ M LSSR A B L 40 EL1 BR L Unlock Detection UL J13 Rear Door Lock Assembly LH 62 Unlock Detection Unlock Lock E60 Junction Connector ... LSSR UL L L I6 Front Door Lock Assembly RH I2 Front Door Control Switch Assembly RH G 74 Unlock Detection 12 IE3 I14 Front Door Lock Assembly LH 13 IE3 E61 Junction Connector 44 G B G B R A R A ... Control Switch OFF Tail Head AUTO Dimmer Switch Flash Low High OFF On W–B W–B E14 Headlight Dimmer Switch Assembly 12 10 60 W–B 20 13 E59 Junction Connector E62 Junction Connector W–B Fog Switch...
Ngày tải lên: 22/10/2012, 15:23

Bản vẽ sơ đồ mạch điện xe ô tô LEXUS LX 570 - P4
... Electrical Key Oscillator SB P L8 Rear Indoor Electrical Key Oscillator SB D E96 Front Indoor Electrical Key Oscillator G V B C L SB Multiplex Communication System (CAN)< 2–14> A L21 Door Control Receiver ... Connector B Taillight System < 3–41> Door Lock Control System < 3–15> Interior Light System < 3–26> HORN Relay < 22–4> Stop Light Switch Assembly< 15–2> Interior Light System < 3–25> < 3–27> < 3–28> ... Back Door Lock Assembly W Courtesy 14 KL2 (∗2) W BR (∗1) W W (∗2) W W W W W W–B SK2 S19 Back Door Lock Assembly Courtesy (∗2) W W 22 BR 10 W–B Diode (Power Back Door) < 3–25> Diode (Back Door Courtesy)...
Ngày tải lên: 22/10/2012, 15:23

Bản vẽ sơ đồ mạch điện xe ô tô LEXUS LX 570 - P5
... Regulator Motor Assembly RH G J4 Rear Power Window Regulator Motor Assembly RH L M 17 JL1 AUTO GND W–B 10 JL1 J3 Rear Power Window Regulator Switch Assembly RH A I3 Front Power Window Regulator Switch ... 5 LX 570 (Cont' d) P o w e r W in d o w (BAT) (BAT) 20A RR DOOR RH 20A FR DOOR RH 31 2D L L 33 2D E61 Junction Connector L G LEXUS LX 570 (EM08F0U) 18 G 11 IE2 28 G 39 EL1 58 EL1 4 IE2...
Ngày tải lên: 22/10/2012, 15:23