the art of cooking and serving margaret atwood summary

The Art of Writing and Speaking the English Language
... few other words ei has the sound of i long. In great, break, and steak ea has the sound of a long; in heart and hearth it has the sound of a Italian, and in tear and bear it has the sound of a ... come, and thus get the key to the accent. It will be seen that rules are of little value, in this as in other departments of the study of language. The main thing is to form the habit of observing ... that of leading the student through the maze of a new science and teaching him the skill of an old art, exemplified in a long line of masters. By way of preface we may say that the mastery of the...
Ngày tải lên: 07/11/2012, 15:59

the art of printmaking and how it is done in other countries
Ngày tải lên: 21/03/2014, 22:52

jonas - 1818 - the distiller's guide; comprehending the art of distillation and rectification
Ngày tải lên: 12/06/2014, 11:33

levesque - 1836 - the art of brewing and fermenting in the summer -- and the making of malt
Ngày tải lên: 12/06/2014, 11:36

The Art of Poser and Photoshop- P1 pdf
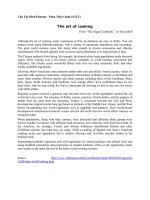
... 1.22. The Art of Poser and Photoshop: The Official Guide14 Figure 1.17 Viewing the minimized palette The Art of Poser and Photoshop: The Official Guide16 Figure 1.20 Access the expanded view of the Adjustment Layers ... one of the tabs and peel it off into the open portion of the document, and it will become a new window. To add more tabs to the new window, you simply click on the one of the remaining tabs and ... The Art of Poser and Photoshop: The Official Guide6 Figure 1.2 Applying the Rotate View tool Figure 1.3 A view of the Arrange Document command in action Chapter 1 ■ Poser and Photoshop...
Ngày tải lên: 02/07/2014, 08:20
The Art of Poser and Photoshop- P2 ppt
... view of the texture applied to the shirt and Figure 1.44 shows the final results. The Art of Poser and Photoshop: The Official Guide24 Figure 1.35 Initial modifi- cation of the UV texture with the Hue/Saturation adjustment layer ... as part of the current project. See Figure 1.60. The Art of Poser and Photoshop: The Official Guide36 Figure 1.59 Establish the quality of the previewed thumbnails Figure 1.60 Establish the rating ... Photo Downloader The Art of Poser and Photoshop: The Official Guide20 2. Click and hold the 3D Tools icon in the Tools palette to view the variety of com- mands that are available. Activate the 3D Rotate...
Ngày tải lên: 02/07/2014, 08:20

The Art of Poser and Photoshop- P3 pot
... in Figure 1.130. 2. Select the hip and pull it upward and to the left. Note how the feet and any part of the body between the feet and the hip continue to point toward the ground plane. See Figure ... posed using forward kinematics. The Art of Poser and Photoshop: The Official Guide66 Figure 1.119 The Face cam- era’s viewpoint Figure 1.120 View of the Face room To the left of your animation scene, ... that the advantage of cameras like the Hand camera is that it will zoom in on the hand and rotate around it so that you can focus just on that body part only. This works the same for all of the...
Ngày tải lên: 02/07/2014, 08:20
The Art of Poser and Photoshop- P4 pptx
... up the texture for the entire face. This includes the front, side, and rear of the head and the texture for both the underside and top of the tongue located in the lower-right and lower-left corners ... Photoshop and create the mountain scene into which you’ll integrate the Poser head. The Art of Poser and Photoshop: The Official Guide106 Figure 2.17 Desaturate the texture map Figure 2.18 View of the desaturated map ... clicking the symbol that looks like a camera on the right side of the Preview tab to preview the final look. Figure 2.13 shows the Render button. The Art of Poser and Photoshop: The Official...
Ngày tải lên: 02/07/2014, 08:20

The Art of Poser and Photoshop- P5 ppsx
... 2.31 Warping the texture to the portrait The Art of Poser and Photoshop: The Official Guide120 Figure 2.39 Apply the angled jitter Figure 2.40 Apply the scat- tering The Art of Poser and Photoshop: The ... of Poser and Photoshop: The Official Guide110 Figure 2.23 Widen the falloff to con- sume the head Figure 2.24 Change the color of the light source The Art of Poser and Photoshop: The Official ... detail to the subject. The Art of Poser and Photoshop: The Official Guide114 Figure 2.29 Create the grassy plain The Art of Poser and Photoshop: The Official Guide118 Figure 2.35 Create the stream...
Ngày tải lên: 02/07/2014, 08:20

The Art of Poser and Photoshop- P6 pps
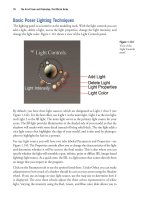
... background The Art of Poser and Photoshop: The Official Guide166 Figure 3.54 Apply the gra- dient behind the body as well as behind the raised hand of the light goddess Figure 3.55 Apply the gra- dient ... to fake the appearance of a three-dimensional object. The top and front-right sides of the box in this example are created with the use of the yellow lines. The front and top sections of the box ... you’re going to pose the left hand. Select the Hand camera and open the parameters for the hand so that you’ll be able to view the controls for every aspect of the hand. With these you can apply...
Ngày tải lên: 02/07/2014, 08:20

The Art of Poser and Photoshop- P7 ppsx
... from the model. See Figure 3.58. The Art of Poser and Photoshop: The Official Guide168 Figure 3.58 Apply the gra- dient streaks around the perimeter of the model Give the Goddess Wings 1. Go to the ... 4.10. The Art of Poser and Photoshop: The Official Guide188 Figure 4.12 Choose con- crete.jpg as your new tex- ture Figure 4.13 Display of the PoserSurface panel The Art of Poser and Photoshop: The ... of the hair layers. Next, Select the Smudge tool and set the opacity to 50%. Use the brush that you created in Figure 3.72 and blend the stands of hair using an Opacity set- ting of 50%. On the...
Ngày tải lên: 02/07/2014, 08:20

The Art of Poser and Photoshop- P9 potx
... Place these bands under- neath the transparent tube layers so that they create the backside of the cylinder. The Art of Poser and Photoshop: The Official Guide234 Figure 5.24 Select a portion of the ... overall texture. The higher the number, the more extreme the contrast will become; the lower the number, the flat- ter the tonality will be. The Art of Poser and Photoshop: The Official Guide252 Figure ... portion of the texture to be used as the metal bands around the tube Figure 5.25 Wrap the tex- ture around the base and top of the tube The Art of Poser and Photoshop: The Official Guide240 Figure 5.34 Imported Kelvin...
Ngày tải lên: 02/07/2014, 08:20

The Art of Poser and Photoshop- P10 pptx
... tone near the base of the tube The Art of Poser and Photoshop: The Official Guide262 Figure 5.75 Apply the image map to the Specular_Color channel Figure 5.76 Apply the image map to the Bump channel ... 259 Figure 5.71 View of the Image_Map node added to the X Scale channel The Art of Poser and Photoshop: The Official Guide260 Figure 5.72 View of the Image_Map node added to the Y Scale channel Figure ... with the character, so access the layer with the stone figures and edit out some of the stone detail by applying a 50% gray mask in the shape of the tube. The gray mask will leave some of the...
Ngày tải lên: 02/07/2014, 08:20

The Art of Poser and Photoshop- P11 docx
... 6.46. The Art of Poser and Photoshop: The Official Guide308 Figure 6.41 Position the bark detail over the left shin The Art of Poser and Photoshop: The Official Guide294 Figure 6.17 Apply ivy land- scape.jpg ... a Shadow Blur Radius of 18. This option controls the edge feathering of the shadow detail. The higher the number, the softer the shadow; the lower the number, the sharper the edge. Render your ... to restrict the detail to the shape of the leg. Since you want to restrict this detail to the outline of the object, you need to create a selection in the shape of the figure. Go to the figure...
Ngày tải lên: 02/07/2014, 08:20


Bạn có muốn tìm thêm với từ khóa: