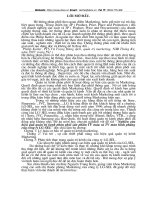
sửa lỗi màn hình đen của win 7


Giáo trình sửa chữa màn hình LCD - Chương1
... 40.00MHz 800×600 48.10KHz 72 Hz 50.00MHz SVGA 800×600 46.90KHz 75 Hz 49.50MHz 1024 76 8 48.40KHz 60Hz 65.00MHz 1024 76 8 56.50KHz 70 Hz 75 .00MHz XGA 1024 76 8 60.02KHz 75 Hz 78 .75 MHz 1280×1024 64.00KHz ... Frequency DOS 72 0×400 31.47KHz 70 Hz 28.32MHz 640×480 31.47KHz 60Hz 25.18MHz 640×480 37. 90KHz 72 Hz 31.50MHz VGA 640×480 37. 50KHz 75 Hz 31.50MHz 800×600 35.16KHz 56Hz 36.00MHz 800×600 37. 90KHz 60Hz ... BOARD SHIELDING. I. MB17SE LCD Monitor Overview Main product features include z 17 LCD Monitor z Recommended Resolution: 1280*1024 z MB17SE:5 ms (Tr+Tf) Quick response time...
Ngày tải lên: 15/11/2012, 16:57

Giáo trình sửa chữa màn hình LCD - Chương2
... 21 4. Remove 3 pieces of TAPE on LVDS CABLE. 5. Unplug LVDS CABLE 17 7. Remove MAIN BOARD. Power Board 1. Remove 2 screws on POWER BOARD SHIELDING. ... KEY BOARD. 2. Lay the KEY BOARD down over the Panel Frame. 37 MB19SE 31 Key Board 1. Connect POWER BOARD CABLE with both POWER BOARD ... modules will be provided for your service needs. The assembly procedure consists of the following steps: 4.1 Bezel Subsystem 4.2 Panel Subsystem 4.3 Board Subsystem 4.4 Stand Subsystem...
Ngày tải lên: 15/11/2012, 16:57

Giáo trình sửa chữa màn hình LCD - Chương 3
... 2. Insert the sticker in the gap and slide along the side to dismount back cover. 7 5. Tighten 2 screws. 6. Mount Back Cover 3 - 10 POWER BOARD ... procedure of the LCD monitor. Be sure to use proper tools described in the previous chapter. SUS MM17T and MM19 SE/TE LCD monitor consist of various subsystem. This section describes the procedures ... modules will be provided for your service needs. The disassembly procedure consists of the following steps: A • I. Stand Subsystem • II. LCD Subsystem • III. Front Bezel Subsystem • IV....
Ngày tải lên: 15/11/2012, 16:57
Giáo trình sửa chữa màn hình LCD - Chương4
... x 600 37. 90KHz 72 Hz 50.00MHz 800 x 600 48.10KHz SVGA 75 Hz 49.50MHz 800 x 600 46.90KHz 60Hz 65.00MHz 1024 x 76 8 48.40KHz 70 Hz 75 .00MHz 1024 x 76 8 56.50KHz XGA 75 Hz 78 .75 MHz 1024 x 76 8 60.02KHz ... Frequency Resolution Horizontal Frequency DOS 70 Hz 28.32MHz 72 0 x 400 31.47KHz 60Hz 25.18MHz 640 x 480 31.47KHz 72 Hz 31.50MHz 640 x 480 37. 90KHz VGA 75 Hz 31.50MHz 640 x 480 37. 50KHz 56Hz 36.00MHz 800 x 600 ... Time 2ms(Gray to Gray) Brightness (Max.) 300cd/m2 Contrast Ratio (Max.) 70 0:1 Viewing Angle (H/V) 170 /160 170 /150 Max. Resolution WSXGA+1680x1050 Pixel Pitch 0.282mm 0.258mm Panel...
Ngày tải lên: 15/11/2012, 16:57

Giáo trình sửa chữa màn hình LCD - Chương5
... 40.00MHz 800×600 48.10KHz 72 Hz 50.00MHz SVGA 800×600 46.90KHz 75 Hz 49.50MHz 1024 76 8 48.40KHz 60Hz 65.00MHz 1024 76 8 56.50KHz 70 Hz 75 .00MHz XGA 1024 76 8 60.02KHz 75 Hz 78 .75 MHz 1280×1024 64.00KHz ... Frequency DOS 72 0×400 31.47KHz 70 Hz 28.32MHz 640×480 31.47KHz 60Hz 25.18MHz 640×480 37. 90KHz 72 Hz 31.50MHz VGA 640×480 37. 50KHz 75 Hz 31.50MHz 800×600 35.16KHz 56Hz 36.00MHz 800×600 37. 90KHz 60Hz ... 60.02KHz 75 Hz 78 .75 MHz 1280×1024 64.00KHz 60Hz 108.00MHz SXGA 1280×1024 78 .00KHz 75 Hz 135.00MHz VESA 1152×864 67. 50KHz 76 Hz 108.00MHz * Modes not listed in the table may not be supported....
Ngày tải lên: 15/11/2012, 16:57

Giáo trình sửa chữa màn hình LCD - Chương6
... 41 7. Mount form the bottom of HINGE FRONT COVER, and press along both sides to lock 6 latches. ... 36 4. Secure 4 screws to lock VGA and DVI port. 5. Secure 8 screws 1 87 65 4 3 2 15 3.2 Board Subsystem Back Cover 1. Release 2 screws on the BACK COVER. ... Glare Yes Resoponse Time 8ms Brightness (Max.) 330cd/m2 Contrast Ratio (Max.) 600:1 Viewing Angle (H/V) 150/130 Max. Resolution WXGA+ 1440*900 Pixel Pitch 0.285mm Display Color...
Ngày tải lên: 15/11/2012, 16:57

Giáo trình sửa chữa màn hình LCD - Chương7
... 300cd/m2 Contrast Ratio (Max.) 800:1 Viewing Angle (H/V) 176 °/ 176 ° Max. Resolution WSCGA+1680X1050 Pixel Pitch 0.258mm Display Color 16.7M Panel ZBD Yes Splendid (Video Intelligence) ... consists of the following steps: 4.1 Panel Subsystem 4.2 Board subsystem 4.3 Stand subsystem 24 3. Disconnect INVERTER CABLE from MAIN and POER BOARD 27 8. Pull out the ... needs. The disassembly procedure consists of the following steps: 3.1 Stand Subsystem 3.2 Board subsystem 3.3 Panel subsystem 37 4. Assemble Procedure Information in this section...
Ngày tải lên: 15/11/2012, 16:57

Giáo trình sửa chữa màn hình LCD - Chương8
... 40.00MHz 800×600 48.10KHz 72 Hz 50.00MHz SVGA 800×600 46.90KHz 75 Hz 49.50MHz 1024 76 8 48.40KHz 60Hz 65.00MHz 1024 76 8 56.50KHz 70 Hz 75 .00MHz XGA 1024 76 8 60.02KHz 75 Hz 78 .75 MHz 1280×1024 64.00KHz ... Frequency DOS 72 0×400 31.47KHz 70 Hz 28.32MHz 640×480 31.47KHz 60Hz 25.18MHz 640×480 37. 90KHz 72 Hz 31.50MHz VGA 640×480 37. 50KHz 75 Hz 31.50MHz 800×600 35.16KHz 56Hz 36.00MHz 800×600 37. 90KHz 60Hz ... 75 Hz 78 .75 MHz 1280×1024 64.00KHz 60Hz 108.00MHz SXGA 1280×1024 80.00KHz 75 Hz 135.00MHz VESA 1152×864 67. 50KHz 75 Hz 108.00MHz VESA (Primary) 1440×900 55.90KHz 60Hz 106.00MHz * Modes...
Ngày tải lên: 15/11/2012, 16:57

Giáo trình sửa chữa màn hình LCD - Chương9
... 640 × 350 31.47kHz 70 Hz Dos-mode 72 0 × 400 31.47kHz 70 Hz 640 × 480 31.47kHz 60Hz 640 × 480 35.00kHz 66.6Hz 640 × 480 37. 50kHz 75 Hz VGA 640 × 480 37. 86kHz 72 Hz 800 × 600 37. 879 kHz 60Hz 800 ... × 600 46. 875 kHz 75 Hz 800 × 600 35.16kHz 56Hz 800 × 600 48.01kHz 72 Hz SVGA 832 × 624 49 .72 5kHz 75 Hz 1024 × 76 8 48.363kHz 60Hz 1024 × 76 8 56. 476 kHz 70 Hz XGA 1024 × 76 8 60.02kHz 75 Hz 1280 ... 1024 × 76 8 60.02kHz 75 Hz 1280 × 1024 64.00kHz 60Hz SXGA 1280 × 1024 80.00kHz 75 Hz 3 Index I. MM17D Series/MM19DE LCD Monitor Overview 1 II. Product Specification 2 III. ...
Ngày tải lên: 15/11/2012, 16:57

Giáo trình sửa chữa màn hình LCD - Chương11
... LAMP CABLES. 7. Place down the LCD PANEL, and then sure 6 screws. 2 II. Product Specification Technical Specification PM17TU PM17TE PM17TA Panel Size 17& quot; TFT Anti-Reflection ... v1.0 2006 /7/ 25 First Release 31 3. Connect (A) SPEAKER CABLES (B) KEY BOARD CABLE, (C) AUDIO CABLE and (D) OVERDRIVE BOARD CABLE (for PM17TU only). A B D C I. PM17TU/TE/TA LCD ... IN 3.5mm mini jack Outputs Speaker 2.5WX2 Security Kensington lock Yes VESA Wall Mount 75 X79mm Base Operation Tilt -5/+20 degree ME Color Shining Black Shining Black Silver Power...
Ngày tải lên: 15/11/2012, 16:57
Nghiên cứu hiệu quả quản trị kênh phân phối sản phẩm TV màu và TV màn hình phẳng của Công ty LG- SEL
... 9.000 Tháng 5 10 .73 0 9.300 Tháng 6 13.000 13.000 Tháng 7 10 .70 0 8.000 Tháng 8 7. 010 7. 500 Tháng 9 5.380 9.000 Tháng 10 6.510 8.400 Tháng 11 9.686 7. 600 Tháng 12 12.960 12.000 Bảng 5: Lợng bán của LG-SEL ... bền 4,9 2 Chất lợng hình ảnh 4,84 Chất lợng hình ảnh 4,95 3 Chất lợng âm thanh 4,83 Chất lợng âm thanh 4,92 4 Hình ảnh/sự nổi tiếng của nhÃn hiệu 4,05 Hình ảnh/sự nổi tiếng của nhÃn hiệu 4,4 5 ... một số sản phẩm hàng đầu TV kỹ thuật số (DIGITAL TV). TV với màn hình (Plasma TVs), TV màn hình tinh thể lỏng (LCD TVs), TV màn hình cực phẳng (Platron TVs) để giới thiệu đến ngời tiêu dùng...
Ngày tải lên: 17/04/2013, 11:55

Vì sao máy tính bị lỗi màn hình xanh?
... thống của Windows. Rất nhiều trường hợp ổ cứng của người dùng bị lỗi "corrupt" và cho dù có sửa chữa hay cài lại Windows như thế nào đi chăng nữa thì khi khởi động, máy vẫn bị màn hình ... mềm lỗi Những phần mềm được lập trình cẩu thả (đặc biệt là phần mềm tinh chỉnh hiệu năng của hệ thống) có thể gây ra những vấn đề khá nghiệm trong với máy tính của bạn và dẫn đến lỗi màn hình ... Windows nhằm phát hiện lỗi và sửa chữa kịp thời những dữ liệu này. Trong bài viết sau, chúng tôi sẽ hướng dẫn bạn cách đọc các dòng thông báo trên màn hình xanh và sử dụng công cụ Debug của...
Ngày tải lên: 24/04/2013, 08:07
Bạn có muốn tìm thêm với từ khóa: