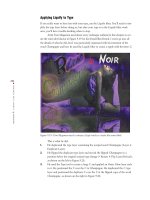
origami 3 the art of paper folding robert harbin


adobe photoshop elements 3 solutions - the art of digital photography
... Elements 31 6 Setting Preferences 31 8 Customizing and Organizing the Work Area 32 2 Histograms 32 4 All about Layers 32 5 Effects 32 9 Selection Tools 33 0 Viewing and Navigation Tools 33 4 Brushes 33 6 Index ... Show menu at the top right of the File Browser window. To remove a flag, select the file or files you wish to remove the flag(s) from and select the flag icon at the top of the File Browser. 436 3_ch01_p5.qxd ... see the extensive toolbar on the left of the screen and the palette bin on the right. You can access Quick Fix by clicking the Quick Fix icon found to the far right of the shortcuts bar, in the...
Ngày tải lên: 04/06/2014, 11:33

Photoshop Elements 3 Solutions: The Art of Digital Photography- P2 ppt
... Show menu at the top right of the File Browser window. To remove a flag, select the file or files you wish to remove the flag(s) from and select the flag icon at the top of the File Browser. 436 3_ch01_p5.qxd ... you change the size of the thumbnail displays via View in the File Browser menu bar, but you can change the size of the entire window by placing your cursor in the lower-right corner of the win- dow ... dragging the window to the desired size. To change the size of the tab items on the left side of the window (Folders, Preview, and Metadata), click the top, right, or bottom border and drag to the...
Ngày tải lên: 02/07/2014, 02:20

Photoshop Elements 3 Solutions: The Art of Digital Photography- P3 ppsx
... wanted. 3. I placed the brush over one of the eyes, and then clicked and held the mouse without moving the cursor. The Bloat tool moved pixels away from the center of the brush, effectively making the ... enlarge the pupil, or the dark part of the eye. To do this, simply choose a smaller brush size and apply the Bloat tool to just that area. 436 3_ch 03_ p4.qxd 10/9/04 10: 03 PM Page 72 73 ■ WHITENING ... FACES ■ Enhancing the Color It’s easy to enhance the color of the eyes. I use a method similar to the one I just described, but instead of using the Dodge tool on the white areas of the eye, I use the Sponge...
Ngày tải lên: 02/07/2014, 02:20

Photoshop Elements 3 Solutions: The Art of Digital Photography- P4 pdf
... finished, he clicked the Commit button ( ) at the top of the options bar. The results are shown on the right in Figure 3. 30. 436 3_ch 03_ p4.qxd 10/9/04 10: 03 PM Page 83 78 CHAPTER 3: BETTER FACES ■ Diminishing ... placed the cursor on the top far left of the image of the man and the horse and “painted” the new sky. I started with a horizontal stroke, going from left to right, filling in the top 33 percent of ... percent of the sky this way and stopped just above the top of the horse and the top of the rock talus. At this point, I wasn’t very precise and some of the clone spilled over the horse and the rock...
Ngày tải lên: 02/07/2014, 02:20
Photoshop Elements 3 Solutions: The Art of Digital Photography- P6 pptx
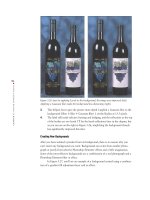
... tweaked the drop shadow by using the settings shown on the left in Figure 5 .33 . The Layers palette is shown on the right. The final image is shown in Figure 5 .34 . Figure 5 .33 : These are the settings ... (See Figure 5.40.) 3. Will then used the Eraser tool ( ) to erase parts of the pasted label so it blend- ed nicely. The final image is shown on the right in Figure 5.40. 436 3_ch05_p4.qxd 10/10/04 ... (left). With the help of the Blur tool, the reflections are softer, more diffused (right). All I did to get the results shown on the right in Figure 5 .38 was select the Blur tool ( ) from the toolbox...
Ngày tải lên: 02/07/2014, 02:20
Photoshop Elements 3 Solutions: The Art of Digital Photography- P7 pptx
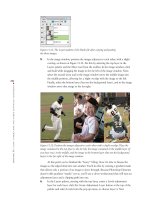
... clicking on them, and then painting the sampled areas over the cones (shown on the left in Figure 7.8). Then she sampled parts of the wall and the sidewalk and painted them over the sandwich ... and then changed to Hard Round 5 pixels as I worked on the wire near the windowsill and the wire near the top of the roof. I chose a hard-edged brush because I wanted to keep the texture of the ... cloning the birds, I went back and fine-tuned my composite. I used the Eraser tool to define the edges of some of the birds. I used a Transform command to slightly reduce the size of one of the birds...
Ngày tải lên: 02/07/2014, 02:20
Photoshop Elements 3 Solutions: The Art of Digital Photography- P8 pot
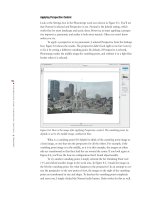
... insertion bar in the shape of an I-beam appeared at the point of clicking. I then typed in my letters. The baseline of my type lined up with the small line through the bottom of the I-beam. The I-beam ... images there if it can’t arrange them.) I then dragged the other thumbnail representations from the lightbox to the main work area, placing each one adjacent to the next. Because parts of the underlying ... I made the image on the left the vanishing point. See what happens to the perspective? In an attempt to cor- rect the perspective to the new point of view, the images to the right of the vanishing point...
Ngày tải lên: 02/07/2014, 02:20
Photoshop Elements 3 Solutions: The Art of Digital Photography- P9 pps
... include ICC color profiling. With two views of your image, one showing the original image and the other showing the effects of the compression, it’s easy to compare them and choose the opti- mal setting. ... compressed the image by using the same Save for Web setting, the file size reduced to 35 4.6KB, a savings of 44KB with no loss of impor- tant details. To push the benefits of blurring a little further, ... hence the smaller file size. The second image (right) contains lots of high-frequency data in the form of thin strands of hair. It takes a lot more work to compress this kind of data; therefore, the...
Ngày tải lên: 02/07/2014, 02:20

Photoshop Elements 3 Solutions: The Art of Digital Photography- P10 pot
... selectively dither a small part of an image and yet keep the other parts intact? You can, by fol- lowing these steps: 1. In RGB mode, select and copy the part of the image to dither (Ctrl/ +C). 2. Index the ... blocked the effect of the Levels command on the mountain and sky areas of the image. 7. For the most part, the mask created by the Gradient tool was enough. However, I did go back into the adjustment ... chose Other from the Matte pop-up menu, and then in the Color Picker I chose FFCC 33, the hexadecimal value for my color. The selected color was displayed in the Matte box. (If you set the Matte...
Ngày tải lên: 02/07/2014, 02:20
Photoshop Elements 3 Solutions: The Art of Digital Photography- P11 doc
... release the mouse. Then Shift+drag from the right edge of the middle image about 1 / 2 inch inward (to the left). 16. Turn off the visibility of the middle image if necessary to see the image on the right. ... visibility of the top layer to see the leftmost edge of the middle image; do this by clicking the eye icon next to the top layer. 15. On the left edge of the middle image, Shift+drag inward (to the ... selecting the top layer in the Layers palette and the Move tool from the toolbar. In the image window, click and hold while dragging the image to the far left of the image window. Next, select the...
Ngày tải lên: 02/07/2014, 02:20
Photoshop Elements 3 Solutions: The Art of Digital Photography- P12 pot
... 215–217, 215–217 dull images, 33 , 33 Auto Levels for, 36 37 , 36 37 , 40 Levels for, 37 –40, 38 39 Smart Fix for, 35 , 35 duplicating files, 23 layers, 98, 127, 32 7 dust and other artifacts, 45 combining ... either of the other two options. 436 3_appendix_p4.qxd 10/11/04 3: 37 PM Page 31 8 Appendix 436 3_appendix_p4.qxd 10/11/04 3: 37 PM Page 31 6 33 0 APPENDIX : A REFERENCE TO THE TOOLS AND FEATURES OF ... 236 characteristics of, 228 converting GIF images to, 242 creating, 230 , 230 for e-mail, 31 0 optimizing images for, 237 –241, 237 –241 quality of, 33 , 59, 234 , 235 rotating, 32 33 saving, 231 – 237 ,...
Ngày tải lên: 02/07/2014, 02:20
Photoshop Elements 3 Solutions: The Art of Digital Photography- P13 pdf
... 107 working with, 33 2 selection marquee, 112 Selection mode, 33 2 selection tools, 33 0 Cookie Cutter, 33 1 33 2, 33 1 Lasso, 33 0 33 1 Magic Wand, 33 1 Marquee, 33 0 options for, 33 3 Selection Brush, 33 2 selections controlling, ... 299 30 1, 30 0 30 1 specialty print layouts for, 30 2 30 3, 30 3 Process Multiple Files dialog box, 30 6 30 7, 30 7 product shots, 111 background in, 133 creating, 134 – 136 , 135 – 136 modifying, 137 – 138 , 137 separating ... 1 13, 115–116, 118–119 simplifying, 133 – 134 , 134 color of, 119–1 23, 119–121, 1 23 depth in, 138 –140, 139 –140 highlights and glare in, 142, 142 keystoning in, 132 – 133 , 132 – 133 labels for, 1 43, 1 43 144 lighting...
Ngày tải lên: 02/07/2014, 02:20


Bạn có muốn tìm thêm với từ khóa: