NỘI DUNG HỌC Phần I: Active Directory and Linux Lab 1: Active directory and Samba Lab 2: Active directory and Bind Lab 3: Openvpn site to site Lab 4: Openvpn client to site Phần II: Web Server Lab 1: Multiple PHP version with Apache on CentOS 8 Lab 2: phpMyAdmin Lab 3: Nginx : Reverse Proxy Phần III: Mail Server Lab 1: Zimbra antivirus antispam Phần IV: High Available Lab 1: MySQL MasterSlave replication Lab 2: MySQL Master Master replication Lab 3: Haproxy – Keepalive Lab 4: High Availability MariaDB Galera Cluster Lab 5: Mysql cluster Phần V: Network monitoring VPS Lab 1: Nagios Monitor Network Services Lab 2: Cacti Monitor Windows Server Cisco Switch Router Lab 3: VPS KVM Phần VI: Storage server Security Lab 1: Gluster Lab 2: Auditd Lab 3: PAM Phần VII: Database Lab 1: Microsoft SQL Server 2019 Lab 2: Oracle database 19c
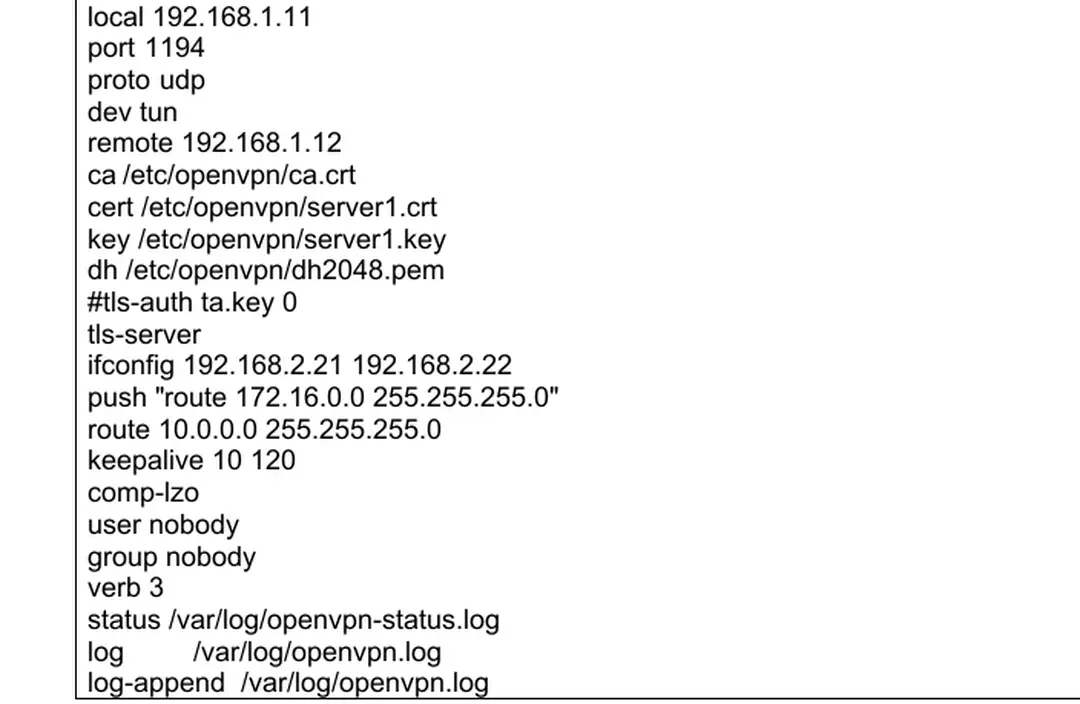
Phần I: Active Directory and Linux ACTIVE DIRECTORY AND SAMBA File Server Samba DC - DNS 192.168.1.12 Client 192.168.1.11 Client Client Máy 2k3: - Nâng cấp lên domain: nhatnghe1.com - DNS: dynamic update – secure and nonsecure, vùng phân giải thuận, nghịch, tạo record cho máy samba - Tạo user: kt1,kt2,kd1,kd2 - Tạo group: g-ketoan(kt1,kt2) - Tạo group: g-kinhdoanh(kd1,kd2) Máy samba: - Đặt tên máy samba.nhatnghe1.com - Sửa file /etc/hosts (thêm dòng) 192.16 8.1.11 samba.nhatnghe1.local samba - Chỉ dns máy DC - Cài ntp crontab -e */2 * * * * /usr/sbin/ntpdate -s -b -p -u 192.168.1.12 service ntpd restart (khi sua file /etc/ntp.conf) B1: Cài đặt Kerberos samba : Installing Kerberos sssd-krb5-1.15.2-50.el7.x86_64 sssd-krb5-common-1.15.2-50.el7.x86_64 krb5-libs-1.15.1-8.el7.x86_64 krb5-workstation-1.15.1-8.el7.x86_64 Cài samba samba-common-4.6.2-8.el7.noarch samba-4.6.2-8.el7.x86_64 samba-client-libs-4.6.2-8.el7.x86_64 samba-client-4.6.2-8.el7.x86_64 samba-winbind-4.6.2-8.el7.x86_64 samba-common-libs-4.6.2-8.el7.x86_64 samba-common-tools-4.6.2-8.el7.x86_64 samba-libs-4.6.2-8.el7.x86_64 samba-winbind-modules-4.6.2-8.el7.x86_64 samba-winbind-clients-4.6.2-8.el7.x86_64.rpm b2 Cấu hình kerberos vi /etc/krb5.conf [root@samba ~]# vi /etc/krb5.conf # Configuration snippets may be placed in this directory as well includedir /etc/krb5.conf.d/ [logging] default = FILE:/var/log/krb5libs.log kdc = FILE:/var/log/krb5kdc.log admin_server = FILE:/var/log/kadmind.log [libdefaults] 10 dns_lookup_realm = false 11 ticket_lifetime = 24h 12 renew_lifetime = 7d 13 forwardable = true 14 rdns = false 15 default_realm = NHATNGHE1.LOCAL 16 default_ccache_name = KEYRING:persistent:%{uid} 17 18 [realms] 19 NHATNGHE1.LOCAL = { 20 kdc = pc02.nhatnghe1.local 21 admin_server = pc02.nhatnghe1.local 22 } 23 24 [domain_realm] 25 nhatnghe1.local = NHATNGHE1.LOCAL 26 nhatnghe1.local = NHATNGHE1.LOCAL - Chỉ DNS máy DC vi /etc/resolv.conf ; generated by /sbin/dhclient-script nameserver 192.168.1.12 - Chỉnh thời gian máy không chênh phút - Chạy lệnh kinit klist để kiểm tra file /etc/krb5.conf lấy tickets từ DC [root@samba ~]# kinit administrator@NHATNGHE1.LOCAL Password for administrator@NHATNGHE1.LOCAL: [root@samba ~]# klist Ticket cache: KEYRING:persistent:0:0 Default principal: administrator@NHATNGHE1.LOCAL Valid starting Expires Service principal 11/06/2017 10:21:00 11/06/2017 20:21:00 krbtgt/NHATNGHE1.LOCAL@NHATNGHE1.LOCAL renew until 11/13/2017 10:20:56 Kiểm tra chứng thực Kerberos authentication với lệnh smbclient [root@samba ~]# smbclient -L /pc02 -k OS=[Windows Server 2008 R2 Enterprise 7600] Server=[Windows Server 2008 R2 Enterprise 6.1] Sharename Type Comment ADMIN$ Disk Remote Admin C$ Disk Default share IPC$ IPC Remote IPC Disk Logon server share NETLOGON Disk Logon server share SYSVOL OS=[Windows Server 2008 R2 Enterprise 7600] Server=[Windows Server 2008 R2 Enterprise 6.1] Server Workgroup Comment Master B3: Soạn file smb.conf Xóa nội dung cũ, dán nội dung sau : #vi /etc/samba/smb.conf # Samba config file created using SWAT # from UNKNOWN (192.168.1.20) # Date: 2015/03/16 15:28:30 [global] workgroup = NHATNGHE1 realm = NHATNGHE1.LOCAL server string = Samba Server Version %v security = ADS log file = /var/log/samba/log.%m max log size = 50 template shell = /bin/bash winbind enum users = Yes winbind enum groups = Yes winbind refresh tickets = Yes idmap config * : range = idmap config * : backend = tdb cups options = raw [homes] comment = Home Directories read only = No browseable = No [printers] comment = All Printers path = /var/spool/samba printable = Yes print ok = Yes browseable = No [printers] comment = All Printers path = /var/spool/samba printable = Yes browseable = No Tiến hành join domain: [root@samba ~]# kinit administrator@NHATNGHE1.LOCAL Password for administrator@NHATNGHE1.LOCAL: [root@samba ~]# net ads join -U Administrator Enter Administrator's password: Using short domain name NHATNGHE1 Joined 'SAMBA' to dns domain 'nhatnghe1.local' Trên máy 2k8 quan sát thấy có máy samba B4 Có thể join domain theo cách sau: Cấu hình winbind: Setup, Authentication configuration Chọn mục [*] Use Winbind [*] Use Winbind Authentication Khai báo thông tin: Chọn Join domain, chọn Yes Quan sát: #vi /etc/nsswitch.conf 33 passwd: files winbind34 shadow: files winbind 35 group: files winbind #vi /etc/pam.d/system-auth #%PAM-1.0 # This file is auto-generated # User changes will be destroyed the next time authconfig is run auth required pam_env.so auth required pam_faildelay.so delay=2000000 auth sufficient pam_fprintd.so auth auth auth auth account account account account account sufficient requisite sufficient required pam_unix.so nullok try_first_pass pam_succeed_if.so uid >= 1000 quiet_success pam_winbind.so use_first_pass pam_deny.so required pam_unix.so broken_shadow sufficient pam_localuser.so sufficient pam_succeed_if.so uid < 1000 quiet [default=bad success=ok user_unknown=ignore] pam_winbind.so required pam_permit.so password requisite authtok_type= password sufficient use_authtok password sufficient password required session session -session session use_uid session session pam_pwquality.so try_first_pass local_users_only retry=3 pam_unix.so sha512 shadow nullok try_first_pass pam_winbind.so use_authtok pam_deny.so optional pam_keyinit.so revoke required pam_limits.so optional pam_systemd.so [success=1 default=ignore] pam_succeed_if.so service in crond quiet required optional pam_unix.so pam_winbind.so B5: Soạn file smb.conf Xóa nội dung cũ, tạo nội dung sau : #vi /etc/samba/smb.conf # Samba config file created using SWAT # from UNKNOWN (192.168.1.20) # Date: 2015/03/16 15:28:30 [global] workgroup = NHATNGHE1 realm = NHATNGHE1.LOCAL server string = Samba Server Version %v security = ADS log file = /var/log/samba/log.%m max log size = 50 template shell = /bin/bash winbind enum users = Yes winbind enum groups = Yes winbind refresh tickets = Yes idmap config * : range = idmap config * : backend = tdb cups options = raw #ldap ssl = no idmap uid = 16777216-33554431 idmap gid = 16777216-33554431 [homes] comment = Home Directories read only = No browseable = No [printers] comment = All Printers path = /var/spool/samba printable = Yes print ok = Yes browseable = No [printers] comment = All Printers path = /var/spool/samba printable = Yes browseable = No Clear the Samba Net cache: [root@samba ~]# net cache flush Delete the Winbind caches: [root@samba ~]# rm -f /var/lib/samba/*.tdb [root@samba ~]# systemctl restart winbind nmb smb [root@samba ~]# systemctl enable winbind nmb smb [root@samba ~]# wbinfo -u NHATNGHE1\administrator NHATNGHE1\guest NHATNGHE1\krbtgt NHATNGHE1\kt1 NHATNGHE1\kt2 NHATNGHE1\kd2 NHATNGHE1\kd1 [root@samba ~]# wbinfo -g NHATNGHE1\domain computers NHATNGHE1\domain controllers NHATNGHE1\schema admins NHATNGHE1\enterprise admins NHATNGHE1\cert publishers NHATNGHE1\domain admins NHATNGHE1\domain users NHATNGHE1\domain guests NHATNGHE1\group policy creator owners NHATNGHE1\ras and ias servers NHATNGHE1\allowed rodc password replication group NHATNGHE1\denied rodc password replication group NHATNGHE1\read-only domain controllers NHATNGHE1\enterprise read-only domain controllers NHATNGHE1\dnsadmins NHATNGHE1\dnsupdateproxy NHATNGHE1\g-ketoan NHATNGHE1\g-kinhdoanh [root@samba ~]# getent passwd | more NHATNGHE1\administrator:*:16777216:16777222:Administrator:/home/NHATNGHE1/administrator:/bin/bash NHATNGHE1\guest:*:16777217:16777223:Guest:/home/NHATNGHE1/guest:/bin/bash NHATNGHE1\support_388945a0:*:16777218:16777222:SUPPORT_388945a0:/home/NHATNGHE1/support_388945a0:/bin/bash NHATNGHE1\krbtgt:*:16777219:16777222:krbtgt:/home/NHATNGHE1/krbtgt:/bin/bash NHATNGHE1\u1:*:16777220:16777222:u1:/home/NHATNGHE1/u1:/bin/bash NHATNGHE1\ngoc:*:16777221:16777222:ngoc:/home/NHATNGHE1/ngoc:/bin/bash NHATNGHE1\hung:*:16777222:16777222:hung:/home/NHATNGHE1/hung:/bin/bash NHATNGHE1\u2:*:16777223:16777222:u2:/home/NHATNGHE1/u2:/bin/bash NHATNGHE1\u3:*:16777224:16777222:u3:/home/NHATNGHE1/u3:/bin/bash NHATNGHE1\iusr_may1:*:16777225:16777222:IUSR_MAY1:/home/NHATNGHE1/iusr_may1:/bin/bash NHATNGHE1\iwam_may1:*:16777226:16777222:IWAM_MAY1:/home/NHATNGHE1/iwam_may1:/bin/bash NHATNGHE1\fpsense:*:16777227:16777222:fpsense:/home/NHATNGHE1/fpsense:/bin/bash NHATNGHE1\kt1:*:16777228:16777222:kt1:/home/NHATNGHE1/kt1:/bin/bash NHATNGHE1\kt2:*:16777229:16777222:kt2:/home/NHATNGHE1/kt2:/bin/bash NHATNGHE1\kd1:*:16777230:16777222:kd1:/home/NHATNGHE1/kd1:/bin/bash NHATNGHE1\kt3:*:16777231:16777222:kt3:/home/NHATNGHE1/kt3:/bin/bash [root@samba ~]# service smb #getent group NHATNGHE1\helpservicesgroup:x:16777225:NHATNGHE1\support_388945a0 NHATNGHE1\telnetclients:x:16777226: NHATNGHE1\domain computers:x:16777227: NHATNGHE1\domain controllers:x:16777228: NHATNGHE1\schema admins:x:16777229:NHATNGHE1\administrator NHATNGHE1\enterprise admins:x:16777230:NHATNGHE1\administrator NHATNGHE1\cert publishers:x:16777231: NHATNGHE1\domain admins:x:16777232:NHATNGHE1\administrator NHATNGHE1\domain users:x:16777222: NHATNGHE1\domain guests:x:16777223: NHATNGHE1\group policy creator owners:x:16777233:NHATNGHE1\administrator NHATNGHE1\ras and ias servers:x:16777234:NHATNGHE1\may1$ NHATNGHE1\dnsadmins:x:16777235: NHATNGHE1\dnsupdateproxy:x:16777236: NHATNGHE1\internet:x:16777237:NHATNGHE1\u1,NHATNGHE1\u2,NHATNGHE1\u3 NHATNGHE1\iis_wpg:x:16777238:NHATNGHE1\iwam_may1 NHATNGHE1\g-kinhdoanh:x:16777239:NHATNGHE1\kd1 NHATNGHE1\g-ketoan:x:16777224:NHATNGHE1\kt1,NHATNGHE1\kt2 #Thêm dịng sau getent passwd khơng thấy user vi /etc/samba/smb.conf [global] ldap ssl = no Clear the Samba Net cache: [root@samba ~]# net cache flush Delete the Winbind caches: [root@samba ~]# rm -f /var/lib/samba/*.tdb 10 11 Quá trình cài đặt bắt đầu 12 Khi xuất hình sau, thực thiện LỆNH : Phiên Bản Thử Nghiệm – Lưu Hành Nội Bộ 161 #su - root /u01/app/oraInventory/orainstRoot.sh /u01/app/oracle/product/12.1.0/dbhome_1/root.sh #exit Nhấn OK Nhấn close, trình cài đặt kết thúc Phần 3: Tạo listener Nhập lệnh sau #netca Next,next Chọn Add, Next Phiên Bản Thử Nghiệm – Lưu Hành Nội Bộ 162 Tên Listener mặc định, Next Chọn giao thức tcp Phiên Bản Thử Nghiệm – Lưu Hành Nội Bộ 163 Xác nhận port No, Next, finish Phiên Bản Thử Nghiệm – Lưu Hành Nội Bộ 164 Kiểm tra LISTENER lsnrctl stop LISTENER lsnrctl start LISTENER lsnrctl status LISTENER tnsping localhost 1521 tnsping myserver 1521 [oracle@may1 database]$ lsnrctl status LISTENER LSNRCTL for Linux: Version 12.1.0.2.0 - Production on 05-MAR-2016 13:01:21 Copyright (c) 1991, 2014, Oracle All rights reserved Connecting to STATUS of the LISTENER LISTENER Alias TNSLSNR for Linux: Version 12.1.0.2.0 - Production Version 05-MAR-2016 13:00:01 Start Date days hr 19 sec Uptime off Trace Level ON: Local OS Authentication Security OFF SNMP Listener Parameter File /u01/app/oracle/product/12.1.0/dbhome_1/network/admin/listener.ora Listener Log File /u01/app/oracle/diag/tnslsnr/may1/listener/alert/log.xml Listening Endpoints Summary (DESCRIPTION=(ADDRESS=(PROTOCOL=ipc)(KEY=EXTPROC1521))) The listener supports no services The command completed successfully [oracle@may1 database]$ Thêm vào bash_profile user oracle su - oracle vi ~/.bash_profile Phiên Bản Thử Nghiệm – Lưu Hành Nội Bộ 165 export ORACLE_SID=orcl export ORACLE_HOME_LISTNER=LISTENER Thực thi: bash_profile Phần 4: Tao database Nhập lệnh [oracle@may1 database]$ dbca Chọn create database, nhấn Next Chọn Advanced mode, Next Phiên Bản Thử Nghiệm – Lưu Hành Nội Bộ 166 Chọn General Purpose or Transaction Processing, nhấn Next Nhập tên csdl orcl.nhatnghe1.com, Next Phiên Bản Thử Nghiệm – Lưu Hành Nội Bộ 167 xác nhận port quản trị EM Nhập password quản trị Phiên Bản Thử Nghiệm – Lưu Hành Nội Bộ 168 Xác nhận LISTENER kết nối csdl 10 Nơi lưu csdl Phiên Bản Thử Nghiệm – Lưu Hành Nội Bộ 169 11 Chọn Sample Schemas 12 Khai báo tham số khởi động Phiên Bản Thử Nghiệm – Lưu Hành Nội Bộ 170 13 Tạo database 14 Nhấn Finish Phiên Bản Thử Nghiệm – Lưu Hành Nội Bộ 171 15 Quá trình tạo database bắt đầu 16 Nhấn Close để kết thúc Phiên Bản Thử Nghiệm – Lưu Hành Nội Bộ 172 Truy cập Enterprise Manager: https://192.168.100.10:5500/em Màn hình quản trị Phiên Bản Thử Nghiệm – Lưu Hành Nội Bộ 173 10 Để kiểm tra xem bạn kết nối với sở liệu [oracle@may1 ~]$ sqlplus sys@orcl AS SYSDBA SQL*Plus: Release 12.1.0.2.0 Production on Sat Mar 13:37:02 2016 Copyright (c) 1982, 2014, Oracle All rights reserved Enter password: Connected to: Oracle Database 12c Enterprise Edition Release 12.1.0.2.0 - 64bit Production With the Partitioning, OLAP, Advanced Analytics and Real Application Testing options SQL> select * from dual; D X SQL> Phần 4: start – script (Booting Oracle 11g R2 Database Server on CentOS 6.2 ) autostart mode vi /etc/oratab orcl:/u01/app/oracle/product/12.1.0/dbhome_1:Y Login in với user root Phiên Bản Thử Nghiệm – Lưu Hành Nội Bộ 174 Tạo file vi /etc/init.d/dbora Tạo nội dung sau cho file #! /bin/sh # # Change the value of ORACLE_HOME to specify the correct Oracle home # directory for your installation ORACLE_HOME=/u01/app/oracle/product/12.1.0/dbhome_1 # # Change the value of ORACLE to the login name of the # oracle owner at your site # ORACLE=oracle PATH=${PATH}:$ORACLE_HOME/bin HOST=`hostname` PLATFORM=`uname` export ORACLE_HOME PATH # if [ ! "$2" = "ORA_DB" ] ; then runuser -l $ORACLE $0 $1 ORA_DB if [ "$PLATFORM" = "Linux" ] && [ "$1" = "start" ] ; then touch /var/lock/subsys/dbora elif [ "$PLATFORM" = "Linux" ] && [ "$1" = "stop" ] ; then rm -f /var/lock/subsys/dbora fi exit fi # case $1 in 'start') $ORACLE_HOME/bin/dbstart $ORACLE_HOME & ;; 'stop') $ORACLE_HOME/bin/dbshut $ORACLE_HOME & rm -f /var/lock/subsys/dbora ;; *) echo "usage: $0 {start|stop}" exit ;; esac # exit Gán quyền chgrp dba /etc/init.d/dbora chmod 750 /etc/init.d/dbora # ln -s /etc/init.d/dbora /etc/rc.d/rc0.d/K01dbora # ln -s /etc/init.d/dbora /etc/rc.d/rc3.d/S99dbora # ln -s /etc/init.d/dbora /etc/rc.d/rc5.d/S99dbora Reboot lại máy Truy cập lại Enterprise Manager https://192.168.100.102:5500/em Phiên Bản Thử Nghiệm – Lưu Hành Nội Bộ 175 ... trúc DNS windows sau cài AD, sử dụng Linux làm DNS tất cấu trúc phải thể Linux 13 Chuẩn bị - Đặt tên máy là: Linux – NS1, windows : DC - Đặt ip cho máy, dns máy linux Các bước thực B1: cài đặt bind... client, login với user kt1 truy cập liệu 11 12 ACTIVE DIRECTORY AND BIND DC 192.168.1.12 Client DNS - Samba 192.168.1.11 Client Client Mục đích - Tích hợp AD vào DNS Linux - Hình ảnh sau cấu trúc DNS... DNS 19 Thông tin kiểm tra DNS máy Linux thành cơng, next để bắt đầu nâng cấp Q trình nâng cấn DC thực B4: Client join domain 20 Tại máy xp dns 192.168.1.11 (máy linux) tiến hành join domain B5:Tài liệu Linux Advanced
175
20
0
THÔNG TIN TÀI LIỆU
Thông tin cơ bản
| Tiêu đề | Active Directory and Linux |
|---|---|
| Trường học | Nhat Nghe University |
| Chuyên ngành | Computer Science |
| Thể loại | Essay |
| Năm xuất bản | 2017 |
| Thành phố | Nhat Nghe |
| Định dạng | |
|---|---|
| Số trang | 175 |
| Dung lượng | 8,81 MB |
| File đính kèm | linux advanced.rar (7 MB) |
Nội dung
Ngày đăng: 27/09/2022, 21:27
HÌNH ẢNH LIÊN QUAN


![Trên node2: Thê m2 dòng sau vào bảng exampleMariaDB [(none)]> show databases; - Tài liệu Linux Advanced](https://media.store123doc.com/figures/001/739/tren-node-the-dong-vao-bang-examplemariadb-databases-1739192.png)


TRÍCH ĐOẠN
MySQL Master-Slave replication
MySQL Master Master replication
High Availability Mysql Cluster DRBD
KV M( Kernel-based Virtual Machin e)
TÀI LIỆU CÙNG NGƯỜI DÙNG
- Đang cập nhật ...
TÀI LIỆU LIÊN QUAN
-
175 20 0
-
162 323 0
-
2 161 0
-
3 284 0
-
2 279 0
-
1 261 0
-
2 275 0
-
109 386 1