Essential elements of portrait photography

Essential Elements of Sanitation in the Beverage Industry
... ARE THERE SANITATION NEEDS? The word sanitation is derived from the Latin “sanitas,” which means health Sanitation in the food industry has been applied to the process of creating and maintaining ... commitment, training, and resources into the sanitation program, beverage manufacturers can maintain the efÞcacy of their sanitation programs, resulting in high-...
Ngày tải lên: 25/10/2013, 21:20

Tài liệu 20 essential tips for Portrait Photography (Phần Retouch) – Part 1 pptx
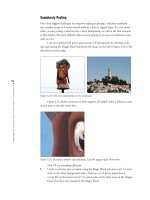
... (hafoto) làm việc Pictage, 10 có problem ánh sáng underexposure (1 bị "cháy", ánh sáng lộn xộn ) Có dạng ảnh bị tối: Toàn bị tối phần ảnh bị tối Trường hợp toàn bị tối Step 1: Control-J để copy ảnh ... có background (ảnh gốc) layer (phần copy) Step 2: Đổi mode từ "normal" sang "screen" Tới đây, bạn cảm thấy hình chưa đủ sáng, bạn Control-J thêm lần để copy "layer 1" thành "layer copy"...
Ngày tải lên: 20/01/2014, 03:20

Tài liệu 20 essential tips for Portrait Photography (Phần Retouch) – Part 2 ppt
... "bằng phẳng" (không phải edge) nhìn mềm mại (soft) hay đanh (strong, hard) Thương setting tư đến 20 thông dụng Mối tương quan radius, amount, threshold Nếu radius đươc set thấp (1 px), bạn có thẻ ... (50%) Threshold: Tùy theo bạn thich ảnh cao hay thấp intension: set thấp (3) nhìn sắc, set cao (20 ) nhìn "mềm" Căn cư vào nhu cầu ảnh mà set cho thích hợp (ví dụ ảnh có edge mạnh hay mềm mại...
Ngày tải lên: 20/01/2014, 03:20

Tài liệu 20 essential tips for Portrait Photography (Phần Retouch) – Part 3 docx
... sắc nhìn "bết bền bệt" Khống sao, dùng layer (layer 1) "mask" (mặt nạ) để che phần mây phía Step 3: Để biến layer thành mask, giữ phím Alt bấm vào nút "Add layer mask" layer panel (được khoanh ... Để bắt đầu dùng phần mây layer che đậy (masking) phần mây layer background, bấm phím "D" để set foreground màu trắng, chọn soft edge brush Tool Panel, với mode "normal, opacity để 100% Step 5: ......
Ngày tải lên: 20/01/2014, 03:20

20 essential tips for portrait photography
... Step 6: Step dzui ta xóa "cháy" Chuẩn bị chưa Bấm phím "D" để set foreground/background mặc định (just it :) ) Bấm phím "X" để set foreground màu đen Chọn "soft edge brush", set Opacity khoãng 50 ... Sau tô lên chỗ "cháy", ta thấy mũi phần trán má cháy Giảm Opacity xuống 20, tô tiếp cho :lol: Thực vùng 70 (hồi 50, cộng 20 70 :) ) Ảnh sau hoàn tất (Step linh động, tùy theo sở thích bạn) Duo...
Ngày tải lên: 13/05/2016, 09:40

Photoshop Elements 3 Solutions: The Art of Digital Photography- P2 ppt
... you change the size of the thumbnail displays via View in the File Browser menu bar, but you can change the size of the entire window by placing your cursor in the lower-right corner of the window ... dragging the window to the desired size To change the size of the tab items on the left side of the window (Folders, Preview, and Metadata), click the top,...
Ngày tải lên: 02/07/2014, 02:20

Photoshop Elements 3 Solutions: The Art of Digital Photography- P3 ppsx
... removed many of the artifacts and left the foreground area sharp Although the filter got rid of most of the smaller artifacts, the larger ones remained To get rid of these, I selected the Clone ... instead of using the Dodge tool on the white areas of the eye, I use the Sponge tool to saturate the colors of the iris (see Figure 3. 12) Figure 3. 12: Use...
Ngày tải lên: 02/07/2014, 02:20

Photoshop Elements 3 Solutions: The Art of Digital Photography- P4 pdf
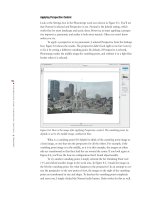
... on the top far left of the image of the man and the horse and “painted” the new sky I started with a horizontal stroke, going from left to right, filling in the top 33 percent of the sky Then, ... the top of the lighthouse I played with the size of the light by dragging one of the handles defining the edges of the light until I got what I wanted To s...
Ngày tải lên: 02/07/2014, 02:20
Photoshop Elements 3 Solutions: The Art of Digital Photography- P6 pptx
... key and then clicks and releases with the Eraser tool on one of the edges at the very top of the image Next he moves the cursor straight down to the bottom of the image and, still holding the Shift ... sense of depth Here’s what I did to replace the background, rotate, and add a drop shadow to the image shown in Figure 5 .32 Figure 5 .32 : The original digital...
Ngày tải lên: 02/07/2014, 02:20
Photoshop Elements 3 Solutions: The Art of Digital Photography- P7 pptx
... started with the red cones, using the Clone Stamp tool to replace them with parts of the sidewalk and street (left) She then cloned the tree on the left side of the image over the area where the ... considering the limits of the relatively inexpensive digital camera Jeannie was using To balance the light and bring out the details of the room, Jeannie used o...
Ngày tải lên: 02/07/2014, 02:20
Photoshop Elements 3 Solutions: The Art of Digital Photography- P8 pot
... insertion bar in the shape of an I-beam appeared at the point of clicking I then typed in my letters The baseline of my type lined up with the small line through the bottom of the I-beam The I-beam ... Generally, the higher the leading value—measured in points the greater the distance between the baseline of one line of type to the baseline of the next...
Ngày tải lên: 02/07/2014, 02:20
Photoshop Elements 3 Solutions: The Art of Digital Photography- P9 pps
... at the most relevant formats and decide After that I will get into the nitty-gritty of using Photoshop Elements to prepare and save to the file formats most useful for the Web and other types of ... Preferences are found on the Photoshop Elements menu.) Saving JPEGs Grabbing Digital: Images from the Web It’s easy to grab digital images directly from the Web and th...
Ngày tải lên: 02/07/2014, 02:20

Photoshop Elements 3 Solutions: The Art of Digital Photography- P10 pot
... “tell” Photoshop to selectively dither a small part of an image and yet keep the other parts intact? You can, by following these steps: In RGB mode, select and copy the part of the image to dither ... holding the Shift key and dragging straight downward from the top of the image This blocked the effect of the Levels command on the mountain and sky areas of the...
Ngày tải lên: 02/07/2014, 02:20