Autodesk Revit Architecture 2011 No Experience Required - part 78 doc

Autodesk Revit Architecture 2011 No Experience Required - part 2 docx
... Objects 22 6 Placing Text and Annotations 23 2 Adding Leader Text 23 5 Modifying the Text Placement 23 7 Are You Experienced? 23 9 ch A p t e r 6 Floors 24 1 Placing a Floor Slab 24 2 Sketching the Slab 24 7 Building ... 199 Dimensioning 20 0 Aligned Dimensions 20 0 Linear Dimensions 21 1 Angular Dimensions 21 3 Radial Dimensions 21 5 Arc Length Dimensions 21 6 Using Dimensions...
Ngày tải lên: 07/07/2014, 07:20

Autodesk Revit Architecture 2011 No Experience Required - part 5 docx
... walls in the model — it does not matter which one. 4. Right-click on the wall. 5. Select Create Similar, as shown in Figure 1.29. NOTE New to Revit 2011, when you right-click on an item, you can ... 1.20. 5. Type 80 and hit Enter. You now have two walls. 6. Move your cursor to the right until you “run into” another blue alignment line. Notice that your temporary dimension says 100...
Ngày tải lên: 07/07/2014, 07:20

Autodesk Revit Architecture 2011 No Experience Required - part 11 docx
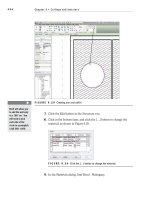
... Zoom into the northeast corner of the building, as shown in Figure 2.48. FIGURE 2.48 The northeast corner 2. Start the Wall command. Make sure it is the same 6 1⁄8″ two-hour partition you ... command. NOTE If you receive an error that says “Ends of the sketched loop do not lie on the boundary of the face being modified” when you are trying to finish the sketch, it is because you have n...
Ngày tải lên: 07/07/2014, 07:20

Autodesk Revit Architecture 2011 No Experience Required - part 16 doc
... section. You do this when you need to show items that are not neces- sarily in line with one another. You can accomplish this in Revit Architecture as follows: 1. Open the Level 1 floor plan. ... item being cut, not allowing the geometry beyond to be seen. Start by opening your model, or go to www.sybex.com/go /revit2 011ner and browse to Chapter 3. Open the file called NER-07.rvt. If...
Ngày tải lên: 07/07/2014, 07:20

Autodesk Revit Architecture 2011 No Experience Required - part 25 docx
... Enter to delete an item. This is no lon- ger a good idea. If you do this to an item in Revit Architecture, it will only remove that element from the current view—not from the entire model. You ... Tool 223 Because these walls are not constrained to always be equal, if one exterior wall is moved, these five interior partitions will always maintain an equal relation- ship to one another—...
Ngày tải lên: 07/07/2014, 08:20

Autodesk Revit Architecture 2011 No Experience Required - part 27 doc
... or just a para- graph of text change the text type and arrowhead type for leader text Revit does not use an SHX font. As a mat- ter of fact, SHX can- not be used at all in Revit. It was ... You Experienced? 239 i W a n t t o C h a n g e a b u n C h o F t e x t a t o n C e ! Now you can. New to Revit 2011, you can use the new Find/Replace feature, shown here: Are You Experienced? N...
Ngày tải lên: 07/07/2014, 08:20

Autodesk Revit Architecture 2011 No Experience Required - part 33 doc
... 26. Press Esc twice to clear the command. 27. Select the roof. Notice there is a node where you picked the point. To access the node, click the Modify Sub Elements button on the Shape Editing ... corridor walls should look exactly the same but are now void of the con- crete parapet cap. FIGURE 7.21 Without the preview checked on, you will not be able to modify the parapet sweep. FIGURE .....
Ngày tải lên: 07/07/2014, 08:20

Autodesk Revit Architecture 2011 No Experience Required - part 37 doc
... extension (.rvt), which you can open and modify directly from either Revit Architecture, Revit Structure, or Revit MEP with absolutely no issues. This chapter will delve into the structural world using ... Items 334 Structural Grids Revit has entire books on this subject alone, so this book will address only the structural items available to people using Revit Architecture. I...
Ngày tải lên: 07/07/2014, 08:20

Autodesk Revit Architecture 2011 No Experience Required - part 42 doc
... Level 3. 3. The walls are now constrained to Level 3. 4. Go to Level 1 under Ceiling Plans (if it is not open already). The next procedure is a tad off-the-beaten-path but it fits squarely within ... the upper-right corner, as shown in Figure 9.11. 6. Click OK. The roof is now transparent. FIGURE 9.11 The View-Specific Element Graphics dialog Creating Ceilings 387 NOTE If you notice that...
Ngày tải lên: 07/07/2014, 08:20
Autodesk Revit Architecture 2011 No Experience Required - part 44 docx
... www.sybex.com/go /revit2 011ner. From there you can browse to Chapter 9 and find these files: Toilet Stall-Accessible-Front-3D.rfa Toilet Stall-Accessible-Side-3D.rfa Toilet Stall-Braced-3D.rfa Chapter ... files; then click Open. They are now loaded into your project. 3. On the Home tab, click the Place A Component button. 4. Select Toilet-Stall-Accessible-Front-3D-60″ × 60″ Clear....
Ngày tải lên: 07/07/2014, 08:20

Autodesk Revit Architecture 2011 No Experience Required - part 48 doc
... floor, if you have any overlapping line segments or gaps, Revit will not let you continue. Also, if you have any extra lines, Revit will not let you continue. Let’s clean up the stairs: 1. Press ... web page at www.sybex.com/go /revit2 011ner. From there you can browse to Chapter 10 and find the file called ADA-Pipe.rfa. You can then download it to your computer. Now perform the followi...
Ngày tải lên: 07/07/2014, 08:20

Autodesk Revit Architecture 2011 No Experience Required - part 49 doc
... staircase in either a renovation project or an addi- tion), you may just need to draft the stairs, then model over the top of the draft- ing lines. What? Drafting in Revit? Of course. How else ... tools, as follows: 1. Select the Annotate tab. 2. Click the Detail Line button, as shown in Figure 10.35. 3. On the Draw panel, click the Start - End - Radius Arc button, as shown near...
Ngày tải lên: 07/07/2014, 08:20

Autodesk Revit Architecture 2011 No Experience Required - part 54 docx
... using AutoCAD Architecture: you do not need to tag an item in order for it to appear in a schedule in Revit Architecture. You can’t really just draft a sched- ule either. But this is not a bad situation ... create a mul- titude of schedules. The bad news is the Revit- produced schedules are not going to look like your company’s schedules at all. Before we go further, it is important...
Ngày tải lên: 07/07/2014, 08:20

Autodesk Revit Architecture 2011 No Experience Required - part 58 docx
... Category on the Annotate tab. 21. Pick any other corridor partition in the floor. Notice that this time the tag is automatically placed with the appropriate MC-1 tag filled out. O In Revit 2011, the ... down into Revit lines and objects. 1. Select the import again. 2. On the Modify | Interior Partition Legend.dwg tab, click Explode ➢ Full Explode, as shown in Figure 11 .58. FIGURE...
Ngày tải lên: 07/07/2014, 08:20

Autodesk Revit Architecture 2011 No Experience Required - part 78 doc
... a curtain wall is to use one that has already been cre- ated for you. The out-of-the-box curtain walls that are provided with Revit have enough instance and type parameters available to make ... file called Curtain Wall-Store Front-Dbl.rfa . 3. Zoom in to the 6 ′×8′ panel. 4. Hover your cursor to the top of the panel. 5. Press the Tab key twice. The panel will now be highlighted. When ....
Ngày tải lên: 07/07/2014, 08:20
- autodesk revit architecture 2011 no experience required part 1 pot
- autodesk revit architecture 2011
- autodesk revit architecture 2011 activation code
- autodesk revit architecture 2011 free download full version
- autodesk revit architecture 2011 keygen free download
- autodesk revit architecture 2011 serial number product key
- autodesk revit architecture 2011 download
- autodesk revit architecture 2011 serial number
- autodesk revit architecture 2011 keygen