Photoshop cs5 cho nhiếp ảnh gia part 5 doc

Photoshop cs5 cho nhiếp ảnh gia part 1 doc
... shown in Figure 1. 2). Although you can create motion blurs in Photoshop, planning your image ahead of time (for example, using a slow shutter speed combined 607343c 01. indd 2 4 /11 /10 11 :02:22 PM 6 c ... in the “Exposure” section of this chapter) to optimize 607343c 01. indd 6 4 /11 /10 11 :02:26 PM 5 ■ CHOOSING RAW VERSUS JPEG Figure 1. 3 A section of an image originally captured...
Ngày tải lên: 02/07/2014, 06:21

Photoshop cs5 cho nhiếp ảnh gia part 5 doc
... (overexposed), it records a maximum value of 255 and a corresponding voltage level is produced. Light levels in between are recorded as some value between 0 and 255 . Although silicon doesn’t suffer directly ... histogram. Note: Some photographers new to digital and Photoshop think they don’t have to worry about exposure anymore because they can “fix it” later in Photoshop. The harsh re...
Ngày tải lên: 02/07/2014, 06:21

Photoshop cs5 cho nhiếp ảnh gia part 15 docx
... template in the future, choose Import to open it, make your changes, and re-export it. Note that the fields Elements allows you to set are limited compared to Photoshop CS5. Renaming After Import Although ... in which the files are sorted. The last icon enables you to place a file in Photoshop (which we don’t normally do as part of our workflow, but graphic artists may use this feat...
Ngày tải lên: 02/07/2014, 07:20
Photoshop cs5 cho nhiếp ảnh gia part 20 docx
... Vignetting: The Eects Tab CS5 added an Effects tab to enable you to add grain to an image and/or apply a Post Crop Vignette as shown in Figure 3.21. Figure 3.21 In CS5 it’s possible to add ... snapshot, open the Snapshot tab and click the snap- shot or choose Apply Snapshot from the fly-out menu at the top right of the tab and choose the desired snapshot. To delete a snapshot, select...
Ngày tải lên: 02/07/2014, 07:20

Photoshop cs5 cho nhiếp ảnh gia part 25 doc
... Application bar, or click the Arrange Documents icon and choose Float All in Windows. To return them to tabbed documents, click on the section with the document name and drag them back next ... It’s generally best to maximize your document window so you can see as much of the image as possible while working in Photoshop. Screen Modes Photoshop CS5 offers three screen modes: Standard...
Ngày tải lên: 02/07/2014, 07:20

Photoshop cs5 cho nhiếp ảnh gia part 28 doc
... TOOLS detailed areas, we can make reasonably accurate selections in many cases, as shown in Figure 4 .28. Figure 4 .28 It was easy to make a reasonably good selection of the penguin by using the Quick Selection ... actual value to use in evaluating pixels for inclusion in the selec- tion. Choose the Eyedropper tool from the Tools panel, and choose an option from the Sample Size drop-do...
Ngày tải lên: 02/07/2014, 07:20

Photoshop cs5 cho nhiếp ảnh gia part 38 doc
... n 607343c06.indd 232 4/12/10 11:42:39 PM 233 ■ USING THE CS5 ADJUSTMENTS PANEL As we discussed in Chapter 3, “Adobe Camera Raw,” in Photoshop CS5 you can make most, if not all, your adjustments ... for JPEGs and TIFFs. However, there are times you’ll choose to use the original tools within Photoshop. Although the exposure tools in ACR and Photoshop are very simi- lar, sometimes th...
Ngày tải lên: 02/07/2014, 07:20

Photoshop cs5 cho nhiếp ảnh gia part 39 doc
... Exposure, Blacks, and Brightness sliders. However, there are still times you may choose to use Levels within Photoshop, particularly if you want to make changes to only one area of your image. We’ll ... of the mask will show no effects of that layer. There are three ways to make parts of the layer mask black that are particularly useful for nature photographers. The first is by creating a...
Ngày tải lên: 02/07/2014, 07:20

Photoshop cs5 cho nhiếp ảnh gia part 40 doc
... layer. Notice that when the adjustment layer appears in the Layers panel, the layer mask is partially white and partially black. The white areas match the shape of the selection you originally created ... 6: EXPOSURE ADJUSTMENTS ■ Because CS5 and Elements 8 are nonmodal, you can work on the layer mask at any time while tweaking the adjustments. (Versions of Photoshop prior to CS4 were...
Ngày tải lên: 02/07/2014, 07:20

Photoshop cs5 cho nhiếp ảnh gia part 44 doc
... ADJUSTMENTS ■ 2. Choose Image > Adjustments > Shadows/Highlights. Shadows/Highlights will automatically be opened as a Smart Filter, as shown in Figure 6.35. Figure 6.35 Photoshop CS5 enables ... to your image, as in Figure 6.37. For Photoshop Elements Users: Shadows/Highlights Adjustment Elements’ Shadows/Highlights tool has a subset of the options Photoshop CS provides, giv...
Ngày tải lên: 02/07/2014, 07:20

Photoshop cs5 cho nhiếp ảnh gia part 45 docx
... image, you’ll have to decide whether to eliminate it. Not all color casts are bad! Remember that part of the reason many nature photographers prefer early-morning and late-afternoon light is for ... Table 7.1 Identifying a Color Cast via the Info Panel (Continued) 607343c07.indd 278 4/13/10 2:41 :45 PM 275 ■ COLOR ADJUSTMENTS 7 Ph oto by Josh An on Color Adjustments Color often create...
Ngày tải lên: 02/07/2014, 07:20
Photoshop cs5 cho nhiếp ảnh gia part 46 docx
... > Remove Color Cast. Then click on part of the image that should be black, gray, or white, and Elements will remove the color cast. This is similar to choosing Levels and using the gray eyedropper. Using ... > Remove Color Cast. Then click on part of the image that should be black, gray, or white, and Elements will remove the color cast. This is similar to choosing Levels and...
Ngày tải lên: 02/07/2014, 07:20

Photoshop cs5 cho nhiếp ảnh gia part 52 doc
... change the focus. 1. In Photoshop, choose File > Scripts > Load Files into Stack, or in Bridge select the images and choose Tools > Photoshop > Load Files into Photoshop Layers. Although ... differs significantly from the Elements method. In Photoshop CS5 we’ll take advantage of a script to load the images into a sin- gle file and then have Photoshop automatically crea...
Ngày tải lên: 02/07/2014, 07:20

Photoshop cs5 cho nhiếp ảnh gia part 57 docx
... 359 ■ FILTERS Blurs Photoshop CS5 has an impressively long list of blurs, but we’ll cover only the ones that are particularly applicable to nature photographs. We ... Auto Scale Image and visually inspect the results, particularly near the edges. Choosing Edge Extension from the Edge drop-down menu will cause Photoshop to automatically fill in the transpar- ent ... and Zoom tool icons...
Ngày tải lên: 02/07/2014, 07:20

Photoshop cs5 cho nhiếp ảnh gia part 63 doc
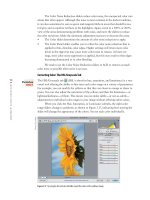
... image by choosing Image > Duplicate (File > Duplicate in Elements). The Duplicate Image dialog box (shown in Figure 10.2) appears, allowing you to enter a name for the new image document. ... the process of optimizing your pho- tographic images in Photoshop. Of course, we could go so far as to say that every opti- mization step is part of the output workflow, since you’re generally...
Ngày tải lên: 02/07/2014, 07:20