Sử dụng photoshop cs5 part 38 pot

Sử dụng photoshop cs5 part 38 pot
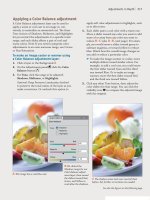
... Highlights: Amount value to subdue the sky. is had the unintended result of making the lower part of the sky too dark. To lighten just the upper midtones, we increased the Radius value (instead ... of an image. To apply a tint via a Solid Color fill layer: 1. Optional: To restrict the tint to part of an image, create a selection. A 2. From the New Fill/Adjustment Layer menu on the...
Ngày tải lên: 02/07/2014, 06:20

Sử dụng photoshop cs5 part 15 potx
... 100. frame. When documents are docked as tabs, it’s easier to arrange and switch among them, and the Photoshop interface is more streamlined. In the Mac OS, we also recommend keeping the Application ... light gray background, which provides a neutral backdrop for color work. A And thirdly, when Photoshop is in Standard Screen mode, the viewing area for the document resizes dynamica...
Ngày tải lên: 02/07/2014, 06:20
Sử dụng photoshop cs5 part 26 potx
... area. C ➤ To create a partial mask, lower the brush opacity via the Options bar before apply- ing strokes. When you edit pixels within the selection, that area will be only partially aected ... the tile layer and revealing part of the underlying Background image. C With the Move tool, we dragged the mask in the document window to reveal a dierent part of the Background. (If you...
Ngày tải lên: 02/07/2014, 06:20

Sử dụng photoshop cs5 part 31 potx
... the sampled color will also pre- view on the top part of a large ring and the cur- rent Foreground or Background color will preview on the bottom part. Click a color in any open document. A Drag ... we kept the blend layer opacity at 100% (except for Dissolve mode). ➤ For most blending modes, Photoshop compares the colors of the two layers (or the layer and the paint color being a...
Ngày tải lên: 02/07/2014, 06:20

Sử dụng photoshop cs5 part 32 pot
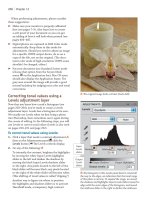
... aecting your document if you monitor the changes in its histogram. After opening a photo into Photoshop — but before you begin editing it — study the histogram to evaluate the existing distribution ... in color, check Show Channels in Color on the panel menu. While a large le is being edited, Photoshop main- tains the redraw speed of the Histogram panel by reading the data from t...
Ngày tải lên: 02/07/2014, 06:20
Sử dụng photoshop cs5 part 34 pot
... it look warmer or cooler), photographers use colored lens lters at the time of the shoot. In Photoshop, you can simulate the eect of a camera lter by using a Photo Filter adjustment layer, ... layer. Levels has a histogram of its own. We usually use Levels when we rst bring a photo into Photoshop, then sometimes use it again during the course of editing. In the following steps, yo...
Ngày tải lên: 02/07/2014, 06:20
Sử dụng photoshop cs5 part 36 potx
... or Curves, but this method is less reliable because it only works if you click in the right spot, which isn’t as easy as it sounds. B ptg 218 Chapter 13 A To neutralize the blue cast
Ngày tải lên: 02/07/2014, 06:20

Sử dụng photoshop cs5 part 41 potx
... ptg 246 Chapter 14 HIDING A SEAM WITH A BRUSH You can edit a layer mask using the Brush tool, a basic Photoshop technique that is described on page 169. REMOVING AREAS OF A MASK WITH A BRUSH B ... and an Opacity of 55% for the Brush tool, and are painting with white as the Foreground color to partially remove the mask (above right). A e e d g e o f a n i m a g e l a y e r i n...
Ngày tải lên: 02/07/2014, 06:20
Sử dụng photoshop cs5 part 50 potx
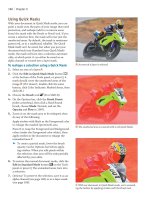
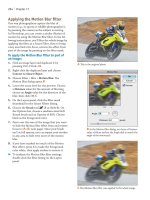
... bring a key area back into focus, remove the eect from part of the image by painting on the lter mask. To apply the Motion Blur filter to part of an image: 1. Click an image layer and duplicate ... (such as around the eyes) and a moderate Tonal Width value to fully sharpen the shadows but only partially sharpen the midtones. ptg Refocusing 299 Applying the Unsharp Mask filter...
Ngày tải lên: 02/07/2014, 06:20
Sử dụng photoshop cs5 part 52 potx
... changes will appear in the Photoshop document. (To edit a Smart Object layer, see page 310.) To create a Smart Object layer by converting existing Photoshop layers: 1. Open a Photoshop document. 2. Select ... in the Smart Object layer in Photoshop. ➤ When you place vector art as a Smart Object into a Photoshop document, it stays as vector art. When you output the Photoshop ...
Ngày tải lên: 02/07/2014, 06:20