pro engineer wildfire 5 0 tutorial and multimedia cd pdf
Tài liệu Pro/ENGINEER Wildfire 3.0 Tips and Tricks - Involute Gears pptx
... 2 .00 0 ã Use Layers to hide the datum curves and sketches ã The completed part is shown below ã Save the part and Close the window Involute Gears Pro/ ENGINEER Wildfire 3 .0 Tips and ... in Figures 5 and 6. Figure 1 Figure 2 Figure 3 Figure 4 Figure 5 Involute curve Figure 6 Pro/ ENGINEER Wildfire 3 .0 Tips and Tricks Involute Gears COPYRIGHT 200 8 CADQUEST ... the Point icon and then pick OK to create a datum point as shown below Pro/ ENGINEER Wildfire 3 .0 Tips and Tricks Involute Gears COPYRIGHT 200 8 CADQUEST INC. Page 5 Gear Parameters...
Ngày tải lên: 20/01/2014, 04:20

SỬ DỤNG LỆNH TOROIDIA BLEND... TRONG PRO/ENGINEER WILDFIRE 5.0 pdf
... nguyendinhthangckm@gmail.com Gv: Nguyễn Đình Thắng 201 0 1 SỬ DỤNG LỆNH TOROIDIA BLEND TRONG PRO/ ENGINEER WILDFIRE 5. 0 Trình tự thực hiện: B1: Vẽ khối có kích thước 100 0 x 100 x 10 (mm) B2: Insert / Advanced ... References sổ hộp thoại -Nhấn chọ vào Solid Geometry -Tại khung Profile Section để vẽ tiết diện uốn cong ta chọn Define -Pro/ e yêu cầu ta chọn mặt phẳng vẽ phác Ta chọn ở giữa khối và vẽ ... giữa khối và vẽ phác như hình dưới nguyendinhthangckm@gmail.com Gv: Nguyễn Đình Thắng 201 0 2 sau khi ta kết thúc vẽ phác ta được hình sau với các lựa chọn cho Toroidia Blend...
Ngày tải lên: 18/03/2014, 13:21

SỬ DỤNG LỆNH TOROIDIA BLEND... TRONG PRO/ENGINEER WILDFIRE 5.0 doc
... Axis nguyendinhthangckm@gmail.com Gv: Nguyễn Đình Thắng 201 0 3 +3 60 degrees Blend: Thể tích uốn góc 3 60 Khi đó ta chọn 2 mặt đầu ... nguyendinhthangckm@gmail.com Gv: Nguyễn Đình Thắng 201 0 2 sau khi ta kết thúc vẽ phác ta được hình sau với các lựa chọn cho Toroidia Blend...
Ngày tải lên: 24/03/2014, 06:20

Pro/ENGINEER Wildfire 3.0 Curriculum Guide phần 1 pdf
... complex product designs using Pro/ ENGINEER Wildfire 3 .0. Duration 3 days Prerequisites ã Introduction to Pro/ ENGINEER Wildfire 3 .0. ã Pro/ ENGINEER Wildfire 3 .0 Update from Pro/ ENGINEER Wildfire ... Flexible Components in ProENGINEER Wildfire 3 .0 ã Reverse Engineering using Pro/ ENGINEER Wildfire 3 .0 ã Introduction to Routed Systems Designer 6 .0 for Pro/ ENGINEER Wildfire 3 .0 ã User Defined ... ã Analyzing and Optimizing Design Models with ProENGINEER Wildfire 3 .0 ã Creating Geometry from Surfaces and Curves using ProENGINEER Wildfire 3 .0 ã Using Component Interfaces and Flexible...
Ngày tải lên: 14/08/2014, 11:21

Tutorial Material for Pro/ENGINEER Wildfire 2.0 pdf
... window (Figure 25) 18. Make sure Constrains and Loads set are highlighted. 19. Click OK to proceed Figure 25 MAE 244 : Dynamics and Strength Laboratory Fall 20 05 Tutorial Material ... Material for Pro/ ENGINEER Wildfire 2 .0 With Integrated Pro/ MECHANICA Tutorial 3: Modeling L-Shaped Rod and Performing Finite Element Analysis using Pro/ MECHANICA ... 20 05 Chuanyu “tony” Feng 2 Introduction This tutorial is similar to Tutorial 2. The difference is that, in this part, you will use Sweep feature to make an L-Shaped Rod, and then apply proper...
Ngày tải lên: 08/08/2014, 12:22

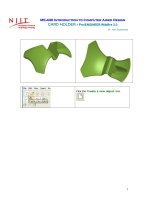
CARD HOLDER - Pro/ENGINEER Wildfire 3.0
... name and definition are displayed as you move the pointer over the appearance in the palette. 1 ME-4 30 Introduction to Computer Aided Design CARD HOLDER - Pro/ ENGINEER Wildfire ... down, and create the same 0 .5 mm round as shown below. Click . 17 Click to change the display to Hidden Line display. Select the filter option, and choose ... as the sketching plane, and select TOP datum plane as Reference, and then choose Top in the Orientation box. 39 Click New Set for round Set 2. Enter 0 .5 mm radius of round...
Ngày tải lên: 19/10/2013, 12:15

ME-430 Introduction to Computer Aided Design ARM BRACKET - Pro/ENGINEER Wildfire 2.0
... 1 ME-4 30 Introduction to Computer Aided Design ARM BRACKET - Pro/ ENGINEER Wildfire 2 .0 Dr. Herli Surjanhata In a system window, create a new directory called ME-4 30 (e.g. H:\PTC_Working_Dir\ME-4 30) . ... and Appearance. 12 Drag the reference handles onto the right and top surfaces of the part. The handle snaps to the reference and an offset value appears in the graphics window. ... TOP datum plane, and set Orientation to Top. Then click the Sketch button . 15 CHANGE THE COLOR OF ARM BRACKET From View pull down menu, select Color and Appearance. ...
Ngày tải lên: 27/10/2013, 17:15

Variable Pitch Helical Extension Spring Pro/ENGINEER Wildfire 2.0
... 5 Modify the Profile of the sweep and change the value of the pitch to [0 .5] . Then Regenerate to see the effect. Right-click the Protrusion from the Model Tree, and choose ... the mouse button, and select Edit. Double click PITCH1 .00 , and change the value 0 .5. Pick the Regenerate icon . Pick the trajectory. 20 4 ... select the lower point first, and the system will prompt for the pitch at each added point and move up to the next point until all points are added. Type [0 .5] and [1 .0] as a pitch at each of these...
Ngày tải lên: 06/11/2013, 00:15

Variable Pitch Conical Spring Pro/ENGINEER Wildfire 2.0
... Right click, and select Edit. Pick PITCH1 .00 and change the value of the pitch to [1 .5] . Select the to Regenerate to see the effect. Pick the top and bottom edges of ... revolved angle to be 1 80. and click the button to finish. CREATE A REVOLVED PROTRUSION AT THE TOP PART OF SPRING Repeat the same procedure as shown above for 1 80 revolved protrusion, here ... Choose Done from the GRAPH menu and OK from the dialog box. ME-4 30 INTRODUCTION TO COMPUTER AIDED DESIGN Variable Pitch Conical Spring Pro/ ENGINEER Wildfire 2 .0 Dr. Herli Surjanhata START...
Ngày tải lên: 06/11/2013, 00:15
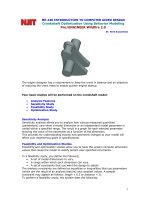
Tài liệu Crankshaft Optimization Using Behavior Modeling Pro/ENGINEER Wildfire 2.0 pptx
... click Add Dimension button , and select appropriate dimensions as shown below – The HEIGHT distance 3 .00 0; the overall WIDTH 4 .00 0 and bottom RADIUS 8 .00 0 of balancing body. The three ... distance vs. the dimension). 1 ME-4 30 INTRODUCTION TO COMPUTER AIDED DESIGN Crankshaft Optimization Using Behavior Modeling Pro/ ENGINEER Wildfire 2 .0 Dr. Herli Surjanhata The engine ... This provides for understanding exactly how geometric changes to your model will affect your engineering goals or specifications. Feasibility and Optimization Studies Feasibility and optimization...
Ngày tải lên: 12/12/2013, 12:15
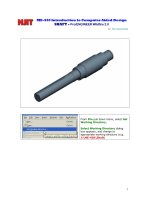
Tài liệu SHAFT - Pro/ENGINEER Wildfire 2.0 docx
... First chamfer: 45 X 0. 03 First chamfer: 45 X 0. 03 First chamfer: 45 X 0. 03 First chamfer: 45 X 0. 03 5 Click to re-dimension as shown ... the same technique to create a 45 x 0. 02 in. chamfer on the edges shown below. Second chamfer: 45 x 0. 02 Second chamfer: 45 x 0. 02 10 In the dashboard, click the Remove ... dialog box appears, and change to appropriate working directory (e.g. J:\ME-4 30\ Shaft) 19 Click the Chamfer Tool . Select 45 x D, and make sure D is 0. 03. Pick...
Ngày tải lên: 12/12/2013, 12:15
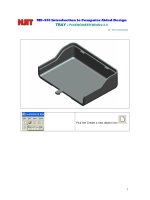
Tài liệu TRAY - Pro/ENGINEER Wildfire 2.0 docx
... 21 Click , and then pick to complete the sweep. 1 ME-4 30 Introduction to Computer Aided Design TRAY - Pro/ ENGINEER Wildfire 2 .0 Dr. Herli Surjanhata ... Create a Sweep Insert -> Sweep -> Protrusion. 15 Pick the appropriate additional reference, and Close the Reference dialog box. Sketch the following ... icon to expand, and pick . Draw horizontal and vertical centerlines through coordinate system. These centerlines are used to ensure symmetry of the section. Click , and draw the...
Ngày tải lên: 12/12/2013, 12:15

Tài liệu Pro/Engineer Wildfire 2.0 potx
... x0 y0 w3 h1" alt=""
Ngày tải lên: 23/02/2014, 08:20

Hướng dẫn cài Pro Engineer wildfire 4.0 ppsx
... phải All file(*.*) mới thấy File) Thay thế 00 -0C-29-3C-E7-A0( có thể là số khác tìm PTC_HOSTID=__-__-__-__-__ trong file) thành 02 -00 -4C-4F-4F- 50 ( số của mạng ảo) . Replace All B4. ... thư mục cài Pro) . Khi hỏi File mdb2mnf.exe tìm đến D:\Program Files (x86)\proeWildfire 4 .0\ mech\i486_nt\bin. Khi hỏi File ptcxfce.exe tìm đến D:\Program Files (x86)\proeWildfire 4 .0\ mech\i486_nt\ptc.Exit ... ptc.distributed.services.4 .0. win32-patch . Khi hỏi File dsq.exe tìm đến D:\Program Files (x86)\proeWildfire 4 .0\ i486_nt\obj. Exit.Ok B 10. Kiểm tra . Run Pro ENGINEER nếu không báo lỗi gì là Ok. B. Cài Pro B1....
Ngày tải lên: 02/07/2014, 15:20


