download giáo trình pro engineer wildfire 5 0

SỬ DỤNG LỆNH TOROIDIA BLEND... TRONG PRO/ENGINEER WILDFIRE 5.0 pdf
... nguyendinhthangckm@gmail.com Gv: Nguyễn Đình Thắng 201 0 1 SỬ DỤNG LỆNH TOROIDIA BLEND TRONG PRO/ ENGINEER WILDFIRE 5. 0 Trình tự thực hiện: B1: Vẽ khối có kích thước 100 0 x 100 x 10 (mm) B2: Insert / Advanced ... References sổ hộp thoại -Nhấn chọ vào Solid Geometry -Tại khung Profile Section để vẽ tiết diện uốn cong ta chọn Define -Pro/ e yêu cầu ta chọn mặt phẳng vẽ phác Ta chọn ở giữa khối và vẽ ... giữa khối và vẽ phác như hình dưới nguyendinhthangckm@gmail.com Gv: Nguyễn Đình Thắng 201 0 2 sau khi ta kết thúc vẽ phác ta được hình sau với các lựa chọn cho Toroidia Blend...
Ngày tải lên: 18/03/2014, 13:21

SỬ DỤNG LỆNH TOROIDIA BLEND... TRONG PRO/ENGINEER WILDFIRE 5.0 doc
... trục Axis nguyendinhthangckm@gmail.com Gv: Nguyễn Đình Thắng 201 0 3 +3 60 degrees Blend: Thể tích uốn góc 3 60 Khi đó ta chọn 2 mặt đầu ... nguyendinhthangckm@gmail.com Gv: Nguyễn Đình Thắng 201 0 2 sau khi ta kết thúc vẽ phác ta được hình sau với các lựa chọn cho Toroidia Blend...
Ngày tải lên: 24/03/2014, 06:20

Giáo trình Pro Engineer Wildfire docx
... class="bi x0 y0 w1 h1" alt=""
Ngày tải lên: 27/06/2014, 04:20


Giáo trình Pro/Engineer WF5.0
... CADCAMCNCTECH Pro/ E WF5 .0 Thái Hùng ( cadcamcnctechnology@yahoo.com) Page 1 Bài 1 : Mô hình vẽ phác – Sketcher Sketcher là môi trường đồ hoạ, sử dụng Pro/ Engineer WF5 .0 để thiết kế ... (Import). Quy trình dựng hình Các công cụ thiết kế đối tượng hình học Trung Tâm Đào Tạo CADCAMCNCTECH Pro/ E WF5 .0 Thái Hùng ( cadcamcnctechnology@yahoo.com) Page 10 Để ghi kích ... Lệnh Blend có hai dạng : Protrusion và Cut; lựa chọn từ Insert > Blend > Protrusion hoặc Cut Các lựa chọn phụ : Trung Tâm Đào Tạo CADCAMCNCTECH Pro/ E WF5 .0 Thái Hùng ( cadcamcnctechnology@yahoo.com)...
Ngày tải lên: 07/01/2014, 23:39

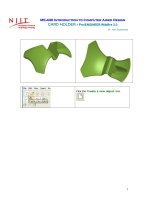
CARD HOLDER - Pro/ENGINEER Wildfire 3.0
... over the appearance in the palette. 1 ME-4 30 Introduction to Computer Aided Design CARD HOLDER - Pro/ ENGINEER Wildfire 3 .0 Dr. Herli Surjanhata Pick the Create a new ... Click New Set for round Set 2. Enter 0 .5 mm radius of round for Set 2 Pick the edge as shown. Click New Set for round Set 3. Enter 1 .0 mm radius of round for Set 3 Pick ... 35 Click . Enter the shell thickness of 3 .0 mm. Pick the all side faces (THREE surfaces) and bottom surface as shown. Click . Create another shell with 0. 8...
Ngày tải lên: 19/10/2013, 12:15

ME-430 Introduction to Computer Aided Design ARM BRACKET - Pro/ENGINEER Wildfire 2.0
... 1 ME-4 30 Introduction to Computer Aided Design ARM BRACKET - Pro/ ENGINEER Wildfire 2 .0 Dr. Herli Surjanhata In a system window, create a new directory called ME-4 30 (e.g. H:\PTC_Working_Dir\ME-4 30) . ... Horizontal: 10 Vertical: 12 .5 This placement references can be verified by clicking the Placement tab. Click . 6 Click . Type in 40 for ... the Extrude on both sides icon . Enter the cut depth 25 mm. Click . Click on to define sketch section for cut. 5 Click the Close button in the References dialog...
Ngày tải lên: 27/10/2013, 17:15

Variable Pitch Helical Extension Spring Pro/ENGINEER Wildfire 2.0
... Double click PITCH1 .00 , and change the value 0 .5. Pick the Regenerate icon . Pick the trajectory. 20 4 Sketch a circle with diameter 0. 25 centered on the ... The revolved angle is 30 degrees. RIGHT datum plane 1 ME-4 30 INTRODUCTION TO COMPUTER AIDED DESIGN Variable Pitch Helical Extension Spring Pro/ ENGINEER Wildfire 2 .0 Dr. Herli Surjanhata ... in Figure below. 5 Modify the Profile of the sweep and change the value of the pitch to [0 .5] . Then Regenerate to see the effect. Right-click the Protrusion from the Model...
Ngày tải lên: 06/11/2013, 00:15

Variable Pitch Conical Spring Pro/ENGINEER Wildfire 2.0
... revolved angle to be 1 80. and click the button to finish. CREATE A REVOLVED PROTRUSION AT THE TOP PART OF SPRING Repeat the same procedure as shown above for 1 80 revolved protrusion, here ... GRAPH menu and OK from the dialog box. ME-4 30 INTRODUCTION TO COMPUTER AIDED DESIGN Variable Pitch Conical Spring Pro/ ENGINEER Wildfire 2 .0 Dr. Herli Surjanhata START CREATING A NEW ... the dimensions. When you are done with the section enter [0. 75] as the pitch at the start and end of the profile. A PITCH GRAPH will appear in a sub-window. Pick the three...
Ngày tải lên: 06/11/2013, 00:15
Tài liệu Crankshaft Optimization Using Behavior Modeling Pro/ENGINEER Wildfire 2.0 pptx
... Add Dimension button , and select appropriate dimensions as shown below – The HEIGHT distance 3 .00 0; the overall WIDTH 4 .00 0 and bottom RADIUS 8 .00 0 of balancing body. The three dimensions ... PNT_COG_282) Then pick the axis (e.g. A_4 axis). The Distance = 0. 3 50 236 is shown under Results. Click the Close button. 5 ANALYSIS FEATURES Click the Insert an analysis feature ... 3 Step 1: Create a 1. 25 in diameter cylinder using FRONT datum plane as sketching plane. The extrusion depth is 0 .5 in. Note that the center of the cylinder is 1. 75 in. above TOP datum plane....
Ngày tải lên: 12/12/2013, 12:15
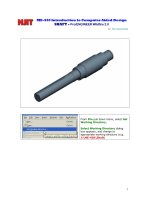
Tài liệu SHAFT - Pro/ENGINEER Wildfire 2.0 docx
... First chamfer: 45 X 0. 03 First chamfer: 45 X 0. 03 First chamfer: 45 X 0. 03 First chamfer: 45 X 0. 03 5 Click to re-dimension as shown ... Use the same technique to create a 45 x 0. 02 in. chamfer on the edges shown below. Second chamfer: 45 x 0. 02 Second chamfer: 45 x 0. 02 10 In the dashboard, click the Remove ... centerline as axis of revolution . Diametral dimension 1 ME-4 30 Introduction to Computer Aided Design SHAFT - Pro/ ENGINEER Wildfire 2 .0 Dr. Herli Surjanhata From File pull down...
Ngày tải lên: 12/12/2013, 12:15
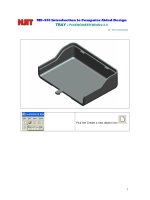
Tài liệu TRAY - Pro/ENGINEER Wildfire 2.0 docx
... and then pick to complete the sweep. 1 ME-4 30 Introduction to Computer Aided Design TRAY - Pro/ ENGINEER Wildfire 2 .0 Dr. Herli Surjanhata Pick the Create a new ... plane. Click . Create a Sweep Insert -> Sweep -> Protrusion. 15 Pick the appropriate additional reference, and Close the Reference dialog box. Sketch ... Click . Then Click . Mirror the Tab Select the tab (Extrude 5) feature from the Model Tree. Pro/ ENGINEER highlights all of the part geometry in the graphics window. From...
Ngày tải lên: 12/12/2013, 12:15
Tài liệu Pro/ENGINEER Wildfire 3.0 Tips and Tricks - Involute Gears pptx
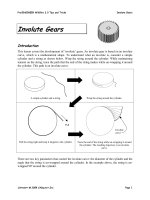
... in Figures 5 and 6. Figure 1 Figure 2 Figure 3 Figure 4 Figure 5 Involute curve Figure 6 Pro/ ENGINEER Wildfire 3 .0 Tips and Tricks Involute Gears COPYRIGHT 200 8 CADQUEST INC. ... to create a datum point as shown below Pro/ ENGINEER Wildfire 3 .0 Tips and Tricks Involute Gears COPYRIGHT 200 8 CADQUEST INC. Page 5 Gear Parameters The following are geometric ... Base diameter Root diameter Fillet size Pro/ ENGINEER Wildfire 3 .0 Tips and Tricks Involute Gears COPYRIGHT 200 8 CADQUEST INC. Page 9 Task 5: Create another datum point and a datum...
Ngày tải lên: 20/01/2014, 04:20

Tài liệu Pro/Engineer Wildfire 2.0 potx
... class="bi x0 y0 w3 h1" alt=""
Ngày tải lên: 23/02/2014, 08:20

Hướng dẫn cài Pro Engineer wildfire 4.0 ppsx
... thế 00 -0C-29-3C-E7-A0( có thể là số khác tìm PTC_HOSTID=__-__-__-__-__ trong file) thành 02 -00 -4C-4F-4F- 50 ( số của mạng ảo) . Replace All B4. Chọn Install the hardware…… chọn next B5. ... thư mục cài Pro) . Khi hỏi File mdb2mnf.exe tìm đến D:\Program Files (x86)\proeWildfire 4 .0\ mech\i486_nt\bin. Khi hỏi File ptcxfce.exe tìm đến D:\Program Files (x86)\proeWildfire 4 .0\ mech\i486_nt\ptc.Exit ... ptc.distributed.services.4 .0. win32-patch . Khi hỏi File dsq.exe tìm đến D:\Program Files (x86)\proeWildfire 4 .0\ i486_nt\obj. Exit.Ok B 10. Kiểm tra . Run Pro ENGINEER nếu không báo lỗi gì là Ok. B. Cài Pro B1....
Ngày tải lên: 02/07/2014, 15:20

Giáo trình Pro/Engineer 2000i doc
... lập trong file config .pro. Chơng 2. Làm quen với Pro/ Engineer 200 0i 19 Bm Máy & Robot-HVKTQS Hớng dẫn sử dụng Pro/ Engineer 200 0i Các loại kích thớc cơ bản đợc Pro/ Engineer cung cấp thông ... 2.2.2. Giao diện ngời dùng của Pro/ E 200 0i Sau khi khởi động, Pro/ E 200 0i đa ra màn hình nh trong hình 2.2. Màn hình làm việc của Pro/ E 200 0i Màn hình làm việc của Pro/ E có vẻ ngoài giống nh màn ... Windows, chọn PROGRAMS -> Pro/ Engineer -> Proe 200 0i. - Kích đúp vào biểu tợng của Pro/ E trên Desktop của Windos. - Tìm và kích vào file <Th mục cài đặt Pro/ E>\bin\proe 200 0i.bat. Đó...
Ngày tải lên: 06/07/2014, 02:20


Bạn có muốn tìm thêm với từ khóa: