adobe premiere pro 2 0 serial


Hướng dẫn sử dụng Canopus Pro 2.0 trong Adobe Premier Pro 2.0
... www.dohoavn.net Hướng dẫn sử dụng Canopus Pro 2. 0 trong Adobe Premier Pro 2. 0 (để nén file và ghi đĩa) Trước hết, yêu cầu là bạn phải cài đặt Canopus Pro 2. 0 vào chương trình AP Sau khi bạn ... muốn lưu file Sau đó bạn nhấn nút Start để thực hiện công việc nén. Đến khi nào hết 100 % là hoàn tất công việc. Chúc các bạn thành công. Ghi chú : Trong AP thì bạn chú ý đến thanh ... Canopus Pro 2. 0 vào chương trình AP Sau khi bạn đã dựng xong phim, bạn vào file – Export – ProCoder 2 Exporter Sau đó xuất hiện www.dohoavn.net – Vietnamese Graphics Tiếp theo bạn...
Ngày tải lên: 27/08/2012, 11:48

Giới thiệu Premiere Pro 2.0
... vi c v i project cu (Nên t o copy c a sequence trong m t project) M project: File > Op en Project Thi t l p l uu project t d ng: (M c d nh sau 20 phút, l uu 5 version g n nh t c a project) ... v i Project: T o Projec t: File > New > Project Luu project: File > Save, File > Save as: copy project, ti p t c l àm vi c v i copy m i File > Save a copy: copy project, ... Motion d xác d nh Opacity c a clip t 0% d n 100 %, thu ng thi t l p trong Timeline 0% : C ho phép nhìn th y h òan tòan clip track ngay b ên du i 100 % : M c d nh, không cho phép nh ìn th y....
Ngày tải lên: 24/04/2013, 21:48

Tài liệu Hưỡng dẫn sử dụng Canopus Pro 2.0 trong Adobe Premier Pro 2.0 pdf
Ngày tải lên: 26/01/2014, 05:20


Hướng dẫn sử dụng Adobe Presenter Pro 7.0
... PowerPoint sẽ xuất hiện thêm một menu mới Adobe Presenter Giao diện của menu Adobe Presenter trong MS PowerPoint 20 03 Hướng dẫn sử dụng Adobe Presenter Pro 7 .0 Ngoài những hiệu ứng về slide như ban ... trình PowerPoint quen thuộc. Hiện, thử nghiệm cho thấy Adobe Presenter hỗ trợ các phiên bản Office XP, 20 03 và định dạng mới PPTX trên PowerPoint Office 20 07 . Để bắt đầu sử dụng, người dùng chỉ cần mở ... bài giảng: âm thanh, video, hình ảnh Giao diện của menu Adobe Presenter trong MS PowerPoint 20 07 Hướng dẫn sử dụng Adobe Presenter Pro 7 .0 Để thể hiện tốt tính tương tác thì ngay mỗi lựa chọn...
Ngày tải lên: 28/09/2013, 08:10
![Hướng dẫn dùng Cool Edit Pro 2.0 [Sưu tầm]](https://media.store123doc.com/images/document/13/to/hs/medium_hsz1382411705.jpg)


Pro .NET 2.0 Windows Forms and Custom Controls in C#
... . . . . . . . 7 32 Macdonald_4398Front.fm Page xviii Friday, November 18, 20 05 5:14 PM Macdonald_4398Front.fm Page xxviii Friday, November 18, 20 05 5:14 PM c5b9fc1a45eb1e 329 bb0a9d79e858c51 v Contents ... book trade worldwide by Springer-Verlag New York, Inc., 23 3 Spring Street, 6th Floor, New York, NY 100 13. Phone 1- 800 -SPRINGER, fax 20 1-348-4 505 , e-mail orders-ny@springer-sbm.com, or visit http://www.springeronline.com. For ... November 18, 20 05 5:14 PM Macdonald_4398Front.fm Page xl Friday, November 18, 20 05 5:14 PM 3 ■ ■ ■ CHAPTER 1 User Interface Architecture S ome developers hate the headaches of user-interface programming....
Ngày tải lên: 19/10/2013, 21:15

ME-430 Introduction to Computer Aided Design ARM BRACKET - Pro/ENGINEER Wildfire 2.0
... 1 ME-4 30 Introduction to Computer Aided Design ARM BRACKET - Pro/ ENGINEER Wildfire 2. 0 Dr. Herli Surjanhata In a system window, create a new directory called ME-4 30 (e.g. H:\PTC_Working_Dir\ME-4 30) . ... Horizontal: 10 Vertical: 12. 5 This placement references can be verified by clicking the Placement tab. Click . 6 Click . Type in 40 for ... to ensure symmetry of the section. Use the appropriate Sketcher Tools to create and dimension the section as shown below. , , , , , 10 Click . Then Click . ...
Ngày tải lên: 27/10/2013, 17:15

Variable Pitch Helical Extension Spring Pro/ENGINEER Wildfire 2.0
... Double click PITCH1 .00 , and change the value 0. 5. Pick the Regenerate icon . Pick the trajectory. 20 4 Sketch a circle with diameter 0 .25 centered on ... revolved angle is 30 degrees. RIGHT datum plane 1 ME-4 30 INTRODUCTION TO COMPUTER AIDED DESIGN Variable Pitch Helical Extension Spring Pro/ ENGINEER Wildfire 2. 0 Dr. Herli Surjanhata ... 12 Creating a 30- degree revolved protrusion. Pick the Revolve Tool icon. Click , then pick . Using revolved protrusion, this...
Ngày tải lên: 06/11/2013, 00:15

Variable Pitch Conical Spring Pro/ENGINEER Wildfire 2.0
... revolved angle to be 1 80. and click the button to finish. CREATE A REVOLVED PROTRUSION AT THE TOP PART OF SPRING Repeat the same procedure as shown above for 1 80 revolved protrusion, here ... GRAPH menu and OK from the dialog box. ME-4 30 INTRODUCTION TO COMPUTER AIDED DESIGN Variable Pitch Conical Spring Pro/ ENGINEER Wildfire 2. 0 Dr. Herli Surjanhata START CREATING A NEW ... Note that A _2 is the axis created during revolved protrusion at the bottom part of the spring. Click the icon to continue. Change the revolved angle to be 1 80. and click the...
Ngày tải lên: 06/11/2013, 00:15
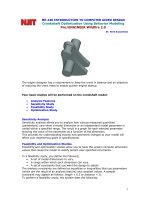
Tài liệu Crankshaft Optimization Using Behavior Modeling Pro/ENGINEER Wildfire 2.0 pptx
... Add Dimension button , and select appropriate dimensions as shown below – The HEIGHT distance 3 .00 0; the overall WIDTH 4 .00 0 and bottom RADIUS 8 .00 0 of balancing body. The three dimensions ... 27 17 The conclusions that can be drawn from the graphs: ã The shoulder distance is greater than 0 .25 for the entire range of height values (2 – 3 .2 inches). ã ... be at least 0 .25 in. larger than the shaft. The desired clearance is measured here. 11 Under Type, choose Distance. Next pick the datum point (e.g. PNT_COG _28 2) Then pick...
Ngày tải lên: 12/12/2013, 12:15
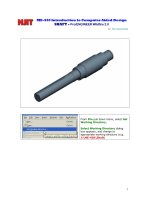
Tài liệu SHAFT - Pro/ENGINEER Wildfire 2.0 docx
... the same technique to create a 45º x 0. 02 in. chamfer on the edges shown below. Second chamfer: 45º x 0. 02 Second chamfer: 45º x 0. 02 10 In the dashboard, click the Remove ... select Properties. The Dimension Properties dialog box open. Change the Number of decimal places to 4. Change the Nominal Value to 1 . 20 20. Change the Upper tolerance to 0. 000 6 ... First chamfer: 45 X 0. 03 First chamfer: 45 X 0. 03 First chamfer: 45 X 0. 03 First chamfer: 45 X 0. 03 5 Click to re-dimension as shown...
Ngày tải lên: 12/12/2013, 12:15
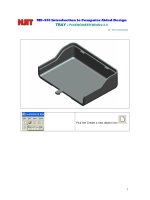
Tài liệu TRAY - Pro/ENGINEER Wildfire 2.0 docx
... 21 Click , and then pick to complete the sweep. 1 ME-4 30 Introduction to Computer Aided Design TRAY - Pro/ ENGINEER Wildfire 2. 0 Dr. Herli Surjanhata ... modify the dimension as shown. 5 Click . Type in 12 for the depth of extrusion. Click . 20 Select Traj. Tangnt Chain Pick the outer top edge ... the Model Tree. Pro/ ENGINEER highlights all of the part geometry in the graphics window. From Edit pull down menu, select the Mirror Tool . 12 Create a Clip Protrusion ...
Ngày tải lên: 12/12/2013, 12:15