Tài liệu Practice Templates Photoshop part 2 docx

Tài liệu Practice Templates Photoshop part 2 docx
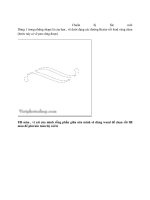
... Clouds: Tạo một layer mới Vẽ lên một số chấm brush mềmcó kích cõe 300px và đătk opaccitu là 10> ;20 % Optional: Cuối cùng thêm vào bảng phong thân hay bia mộ hay nhà cửa trên cái đảo đó ... . Tạo một layer mới với Soft Brush với màu trắng #FFFFFF, vữ một nữa dưới của bầu trời Step 2 – Cắt núi Bạn dùng công cụ pent tool để tạo vùng chọn sau đó kích chuottk phải make...
Ngày tải lên: 24/12/2013, 20:15

Tài liệu Practice Templates Photoshop part 3 docx
... Ctrl+Shift+J to move P letter to new layer Now we have 2 layers, thelam layer and P layer: This step we apply Layer Style to 2 text layers, you will do like the pictures below: ... a selection like this: Create a new layer mask, gradient from white to black, adjust 10 ,20 % and apply this step to P layer too We group all the layers without text to a new group...
Ngày tải lên: 24/12/2013, 20:15
Tài liệu Practice Templates Photoshop part 14 docx
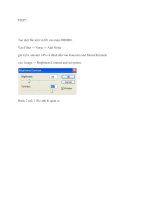
... Monochromatic vào Image -> Brightness/Contrast and set option: Bước 2 mỡ 1 file anh ki quan ra Tương tự ta làm với 2 ki quan trên và…sau khi 1 chut sắp đặt và thêm text cùng với brush
Ngày tải lên: 24/12/2013, 20:15

Tài liệu Practice Templates Photoshop part 8 docx
... brushing Download and load this brush into your Photoshop : AK_VectorPeople STEP 2: Download and load this brush into your photoshop : Land_brush Choose any "island" ... selection with color #12a80d Continue making creat new layer and fill selection like this : Result : STEP 3: Download and load this brush into your Photoshop : T...
Ngày tải lên: 22/01/2014, 02:20
Tài liệu Practice Templates Photoshop part 1 pptx
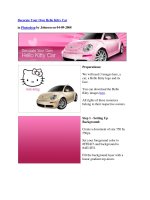
... background and some glitters to the car. Click here to view the final image. Step 2 - Forming the Floor: Create a new layer above the background. Pick the Rectangle Marquee tool ... Saturation to 30, Lightness to 0. Go to Image > Adjustments > Levels. Set the values to 0,0.85 ,25 5. Step 8 - Adding Hello Kitty Logo: Erase to reveal the engine cover. Drag H...
Ngày tải lên: 24/12/2013, 20:15
Tài liệu Practice Templates Photoshop part 15 doc
... tool white to transparent kéo từ 1 góc lên Merge 2 layer bóng và lá thành layer “cánh bông” .Đúp layer , xoay thế này ( xoay xong merge 2 layer lại thành đôi) Đúp lần nữa , ctrl-U chỉnh ... Motion Blur, cái này cũng tuỳ bạn nhé để chọn Angle cho phù hợp. Tham khảo FF chọn 45, Distance là 27 0. ==> Dùng brush trắng mềm chấm vài phát Filter / Distort / Shear Sắp xếp lài...
Ngày tải lên: 24/12/2013, 20:15

Tài liệu Practice Templates Photoshop part 17 ppt
... 1900× 120 0 fro this tutorial. Select some appropriate colors, for example colors of #6d0000, #540000 and drag a linear gradient. Press Ctrl+D to deselect chosen area and set up fill of 20 % for ... Fu Panda’ on two lines. For ‘Kung Fu’ use color of # eb3d1f and for ‘Panda’ use this one # ffcb20. It will be more interesting to warp text like this: For the relief effect apply Filte...
Ngày tải lên: 22/01/2014, 02:20

Tài liệu Practice Templates Photoshop part 7 ppt
... STEP 3: Download and load this brush into your Photoshop : Tree_brush Creat a new document (Ctrl+N) Size at 800x600px or 1 024 x768px that suitable for your monitor. Pick Gradient ... and load this brush into your Photoshop : Cloud Brush Creat a new layer under "island layer" and brush a little Fill this selection with color #12a80d Continue...
Ngày tải lên: 22/01/2014, 02:20

Tài liệu Practice Templates Photoshop part 9 doc
... colorful and fantastic looking CD from scratch. Create a new file (File>New) of 128 0x1 024 px and 72 dpi, which must be painted in #F9C559 with the Paint Bucket Tool (G). Next we’ll ... options, situated on the bottom part of the layers’ panel: Create new fill or adjustment layer>Channel Mixer The layer’s parameters: Fill 20 % Blending mode-S...
Ngày tải lên: 22/01/2014, 02:20