learning autocad 2013 toc

Learning AutoCAD 2010, Volume 1 phần 1 ppt
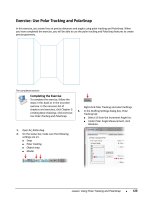
... logo), 3December, 3December.com, 3ds Max, ADI, Alias, Alias (swirl design/logo), AliasStudio, Alias|Wavefront (design/ logo), ATC, AUGI, AutoCAD, AutoCAD Learning Assistance, AutoCAD LT, AutoCAD Simulator, AutoCAD SQL Extension, AutoCAD SQL Interface, Autodesk, Autodesk ... 11 7 Using Polar Tracking and PolarSnap 11 8 Exercise: Use Polar Tracking and PolarSnap 12 5 Less...
Ngày tải lên: 09/08/2014, 11:20

Learning AutoCAD 2010, Volume 1 phần 2 doc
... was saved 11 On the bottom right of the AutoCAD window, click Layout to activate the color layout Close the drawing 12 Now you start a new drawing On the Quick Access toolbar, click New 13 In the ... relative Cartesian or Polar coordinates would be as follows: Point 2: @4,0 or @4
Ngày tải lên: 09/08/2014, 11:20

Learning AutoCAD 2010, Volume 1 phần 3 docx
... end the Line command Lesson: Using Object Snaps s 11 5 Repeat the previous step on the opposite side of the part 10 Close all files Do not save 11 6 s Chapter 2: Creating Basic Drawings Lesson: Using ... endpoint of the line 10 To draw a line perpendicular to the last: s Drag the cursor upward making sure that the angle field displays 90 degrees s Enter 10 0 Press ENTER s 11 To draw a l...
Ngày tải lên: 09/08/2014, 11:20
Learning AutoCAD 2010, Volume 1 phần 4 docx
... To draw a line: s On the Home tab, click Draw panel > Line s Enter 40 00 ,40 00 Press ENTER s Enter 17 49 7 Press TAB s Enter N85d 14' E Press TAB s Click anywhere in the drawing For the next point: ... ENTER Lesson: Using Object Snap Tracking s 13 7 Move the cursor to the left Enter 46 .1 Press ENTER 10 Acquire the point where the arc and angled line meet (1) Track back to the point w...
Ngày tải lên: 09/08/2014, 11:20
Learning AutoCAD 2010, Volume 1 phần 5 pptx
... command s At the Command line, enter U Press ENTER to undo 11 Close all files Do not save Lesson: Selecting Objects in the Drawing s 17 5 Lesson: Changing an Object's Position This lesson describes ... drawing 11 To relocate the water closet towards the other wall: s With the Command line blank, select the water closet s Select the grip and drag it upwards s Enter 650 and press ENTER 18...
Ngày tải lên: 09/08/2014, 11:20
Learning AutoCAD 2010, Volume 1 phần 6 doc
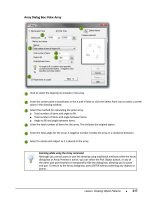
... For Angle to fill (5), enter 360 Click OK (6) Zoom to display your polar array, which should resemble the following illustration Lesson: Creating Object Patterns s 2 21 To create a rectangular array: ... Array (1) Click the Select objects button (2), and click the rectangle Press ENTER to return to the dialog box Enter 12 for Rows (3) and Columns (4) Enter for Row offset (5) and Column offs...
Ngày tải lên: 09/08/2014, 11:20
Learning AutoCAD 2010, Volume 1 phần 7 potx
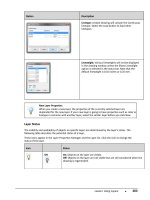
... dialog box, click New Layer (1) s In the Layer Name field (2), enter Title Block s Click the Color field (3) and select White 13 To add another layer: s s s s s 11 This time you will move the ... Click the X to close the Layer Properties Manager dialog box 14 Zoom out to the extents of your drawing Lesson: Using Layers s 2 71 15 To create a rectangular border: s Start the Rectangle comman...
Ngày tải lên: 09/08/2014, 11:20

Learning AutoCAD 2010, Volume 1 phần 8 pot
... see it in the Text Window by pressing F2 Distance = 15 7 .19 24, Angle in XY Plane = 34, Angle from XY Plane = 0Delta X = 13 0.39 38, Delta Y = 87 . 788 9, Delta Z = 0.0000 The following image illustrates ... circle (4)? _ 10 Close the Text Window 3 48 s Chapter 4: Drawing Organization and Inquiry Commands Answers to Exercise Questions Step 11 13 14 Answer Distance = 55 mm Angle = 212...
Ngày tải lên: 09/08/2014, 11:20

Learning AutoCAD 2010, Volume 1 phần 9 pot
... Defined Boundaries s 3 71 10 To remove the construction lines: s Start the Erase command s Select the lines indicated in the following image Press ENTER 11 Your completed drawing 12 Close all files ... command 11 Using the Trim command, clean up the hidden lines as shown in the following image 13 To offset another line: s When prompted for the object to offset, select the centerline agai...
Ngày tải lên: 09/08/2014, 11:20
Learning AutoCAD 2010, Volume 1 phần 10 pot
... point (1) and then point (2) to define the crossing window s Press ENTER 10 To complete the move: s Click a point to the right of the window, and then drag to the right at degrees s Enter 10 00 ... Object's Shape s 4 31 11 To select a door to relocate within a wall: s Start the Stretch command s Click near point (1) and then point (2) to define the crossing window s Press ENTER 12 To r...
Ngày tải lên: 09/08/2014, 11:20

Learning AutoCAD 2010, Volume 2 phần 1 potx
... Using DesignCenter Exercise: Use DesignCenter iv s Contents 22 0 22 1 22 4 22 6 23 2 23 8 24 1 24 2 24 5 Lesson: Using Tool Palettes Using Tool Palette Tools Exercise: ... 24 7 24 8 25 0 25 2 25 5 25 7 Chapter 11 : Creating Additional Drawing Objects 25 9 Lesson: Working with Polylines 26 0 About Polylines 26 1 Creating Polylines 26 2 ... Curved Objects 10 5 Enha...
Ngày tải lên: 09/08/2014, 11:20

Learning AutoCAD 2010, Volume 2 phần 2 pdf
... ePlot.pc3 s ISO A3 ( 420 x 29 7) s Three viewports that not show on the plot s A scale factor for the view at the top of 1:1 s A scale factor for the view on the left of 1 :2 s A scale factor for ... changed in Layout2: s Click the Model tab Confirm that the furniture color remained brown s Click the Layout1 tab Notice that the furniture color remained brown s Click the Layout2 tab Confirm...
Ngày tải lên: 09/08/2014, 11:20

Learning AutoCAD 2010, Volume 2 phần 3 pot
... are 30 0 mm tall as shown in the illustration: s 22 1 through 22 4 - SLEEPING QUARTERS s 20 1 - READY ROOM s 20 2 & 20 4 - LOCKER ROOM s 20 3 - EXERCISE ROOM s 20 5 - DINING ROOM s 20 6 - KITCHEN s 20 7 ... illustration: s 22 1 through 22 4 - SLEEPING QUARTERS s 20 1 - READY ROOM s 20 2 & 20 4 - LOCKER ROOM s 20 3 - EXERCISE ROOM s 20 5 - DINING ROOM s 20 6 - KITCHEN s...
Ngày tải lên: 09/08/2014, 11:20

Learning AutoCAD 2010, Volume 2 phần 4 potx
... metric units, if your final plot scale is 1 :40 , set DIMSCALE to 40 For imperial units, if your final plot scale is 1 /4" =1', set DIMSCALE to 48 ( 12 / 25 = 48 ) DIMSCALE will multiply the dimension ... Chapter 8: Dimensioning 12 To create a linear dimension: s On the Dimensions panel, click Linear s Select point (1) s Select point (2) s Position the dimension as shown 14 To clean...
Ngày tải lên: 09/08/2014, 11:20