Photoshop cs5 cho nhiếp ảnh gia part 4 pps

Photoshop cs5 cho nhiếp ảnh gia part 4 pps
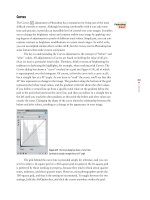
... the right is just before the end of the histogram.) Ph ot o b y EllEn An o n 607 343 c01.indd 18 4/ 11/10 11:02 :41 PM 14 c h a p t e r 1: THINKING DIGITALLY ■ Figure 1.9 A histogram for this shade ... see a histogram that looks like Figure 1.11, you need to add light to your exposure. 607 343 c01.indd 14 4/11/10 11:02:32 PM 17 ■ UNDERSTANDING HISTOGRAMS Figure 1.13 shows an overexposed...
Ngày tải lên: 02/07/2014, 06:21

Photoshop cs5 cho nhiếp ảnh gia part 7 ppsx
... how to remove objects in Photoshop in Chapter 5.) Aperture and Lightroom A few years ago the software choices for digital photography were fairly limited; Photoshop and Photoshop Elements dominated ... themselves to photographing parts of a picture that you will later combine in Photoshop. You can create libraries of these image elements to use at some later time. 6 073 43c01.indd 32...
Ngày tải lên: 02/07/2014, 06:21

Photoshop cs5 cho nhiếp ảnh gia part 9 pps
... help Bridge run faster. As shown in Figure 2 .9, check Adobe Bridge, Adobe Out- put Module, Adobe Photoshop CS5, and Auto Collection CS5. Figure 2 .9 Select only those scripts that you need in ... check box is cleared, raw files open into ACR hosted by Photoshop. When you check the box, the ACR dialog box opens without launching Photoshop. This may seem like a subtle distinction, bu...
Ngày tải lên: 02/07/2014, 07:20
Photoshop cs5 cho nhiếp ảnh gia part 12 pps
... steps: 1. Choose the default workspace that initially is closest to what you want to use. 2. Adjust the size of the pods as described earlier. 3. Select which panels to have visible by choosing ... it, save the workspace by choosing Window > Workspace > Save Workspace or by clicking the Workspace- changer drop-down menu in the top of the interface and choosing Save Workspace. A ... C...
Ngày tải lên: 02/07/2014, 07:20

Photoshop cs5 cho nhiếp ảnh gia part 19 pps
... reduction in Photoshop rather than in ACR. That way, we can use a mask to apply it only to problematic areas and retain full detail in our subject matter. However, the new algorithms in CS5 s ACR ... Ele- ments version of ACR, and not within Photoshop itself. The Tone Curve tab offers another tab to access the Point Curve. This is the type of curve that is found in Photoshop. When y...
Ngày tải lên: 02/07/2014, 07:20

Photoshop cs5 cho nhiếp ảnh gia part 21 pps
... capable of printing. Therefore, one of the other spaces is usually a better choice. Choosing the Depth You have the choice of converting your image into a file with 256 possible tonal val- ues ... interface. You can make multiple snapshots for each image, and open each simultaneously into Photoshop. This is particularly useful with very contrasty images if you want to create two versions t...
Ngày tải lên: 02/07/2014, 07:20
Photoshop cs5 cho nhiếp ảnh gia part 31 ppsx
... a layer mask using a graphics tablet. For Photoshop Elements Users: Setting Brush Options The Elements Brush drop-down list is simpler than the one in CS5, having no options for Master Diameter ... up a panel that allows you to choose which brush options are affected by pen pressure. We recommend leaving this at the default, Size. Try It! Now comes the fun part. You have an empty canv...
Ngày tải lên: 02/07/2014, 07:20

Photoshop cs5 cho nhiếp ảnh gia part 33 ppsx
... flying through it. In Photoshop this is akin to having a pixel layer that is partially transparent (the part that you removed from the print is the transparent part) and partially filled with ... as a Smart Object from ACR, check the Open in Photoshop as Smart Objects option in Workflow Options, and then choose Open Object (or in Photoshop choose File > Open as Smart Object). See...
Ngày tải lên: 02/07/2014, 07:20
Photoshop cs5 cho nhiếp ảnh gia part 42 ppsx
... Anchor points allow you to place a handle on a particular point on the curve and adjust its position. When you do so, Photoshop automatically smoothes out the curve to connect all the anchor ... 11 :42: 55 PM 262 c h a pt e r 6: E X P O SU R E ADJ U ST M E N TS ■ For Photoshop Elements Users: Curves (Continued) 3. On the left, Elements provides different preset styles. We recommend choo...
Ngày tải lên: 02/07/2014, 07:20
Photoshop cs5 cho nhiếp ảnh gia part 48 ppsx
... be times when you want to target a spe- cific part of your image to change, a part that will be determined by the subject matter rather than by a particular color range. For example, you may ... enhance parts of your image— such as the eyes of your subject—is invaluable. Arthur Morris, a world-renowned bird photographer, offers some thoughts on how he uses QuickMasks in conjunction with...
Ngày tải lên: 02/07/2014, 07:20

Photoshop cs5 cho nhiếp ảnh gia part 49 pps
... blending. For Photoshop Elements Users: Using Photomerge To create a new panorama in Elements from Bridge, select your images just as you would in Photoshop CS5 but choose Tools > Photoshop ... Elements. For Photoshop Elements Users: Using Photomerge To create a new panorama in Elements from Bridge, select your images just as you would in Photoshop CS5 but choose Tools >...
Ngày tải lên: 02/07/2014, 07:20

Photoshop cs5 cho nhiếp ảnh gia part 50 pps
... from the menu bar. 4. In the Background layer, select the entire image by choosing Select > All (Ctrl+A/F+A). 5. Choose Edit > Copy (Ctrl+C/F+C) to copy that layer. 6. Alt/Option+click ... The screen will switch to the layer mask and appear white. 7. Choose Edit > Paste (Ctrl+V/F+V) to paste into the layer mask. 8. Choose Filter > Blur > Gaussian Blur and apply a very small ....
Ngày tải lên: 02/07/2014, 07:20

Photoshop cs5 cho nhiếp ảnh gia part 55 pps
... WHITE For Photoshop Elements Users: Converting to Black and White Photoshop Elements has its own Convert to Black and White tool, which works similarly to the Channel Mixer. Open it by choosing ... adjustment layer in Photoshop. We find that with some images we prefer the Channel Mixer and with others, the new Black & White tool. Both offer the ability to allow partial color to app...
Ngày tải lên: 02/07/2014, 07:20

Photoshop cs5 cho nhiếp ảnh gia part 59 pps
... Photoshop; it’s actually easier to do so! One reason is that we have the flexibility to alter exposures as needed. Another reason is that if you didn’t think of using a particular image as part ... way. However, Photoshop at its core is a series of mathematical algorithms, and there are other instructions (algorithms) for how to blend two layers. These are called blend- ing modes. Pho...
Ngày tải lên: 02/07/2014, 07:20

Photoshop cs5 cho nhiếp ảnh gia part 60 pps
... Photoshop; it’s actually easier to do so! One reason is that we have the flexibility to alter exposures as needed. Another reason is that if you didn’t think of using a particular image as part ... way. However, Photoshop at its core is a series of mathematical algorithms, and there are other instructions (algorithms) for how to blend two layers. These are called blend- ing modes. Pho...
Ngày tải lên: 02/07/2014, 07:20