Photoshop Elements 3 Solutions: The Art of Digital Photography- P3 ppsx

Photoshop Elements 3 Solutions: The Art of Digital Photography- P3 ppsx
... to the one I just described, but instead of using the Dodge tool on the white areas of the eye, I use the Sponge tool to saturate the colors of the iris (see Figure 3. 12). Figure 3. 12: Use the ... wanted. 3. I placed the brush over one of the eyes, and then clicked and held the mouse without moving the cursor. The Bloat tool moved pixels away from the...
Ngày tải lên: 02/07/2014, 02:20

adobe photoshop elements 3 solutions - the art of digital photography
... Elements 31 6 Setting Preferences 31 8 Customizing and Organizing the Work Area 32 2 Histograms 32 4 All about Layers 32 5 Effects 32 9 Selection Tools 33 0 Viewing and Navigation Tools 33 4 Brushes 33 6 Index ... Show menu at the top right of the File Browser window. To remove a flag, select the file or files you wish to remove the flag(s) from and select the flag ic...
Ngày tải lên: 04/06/2014, 11:33

Photoshop Elements 3 Solutions: The Art of Digital Photography- P2 ppt
... Show menu at the top right of the File Browser window. To remove a flag, select the file or files you wish to remove the flag(s) from and select the flag icon at the top of the File Browser. 436 3_ch01_p5.qxd ... dragging the window to the desired size. To change the size of the tab items on the left side of the window (Folders, Preview, and Metadata), click...
Ngày tải lên: 02/07/2014, 02:20

Photoshop Elements 3 Solutions: The Art of Digital Photography- P4 pdf
... finished, he clicked the Commit button ( ) at the top of the options bar. The results are shown on the right in Figure 3. 30. 436 3_ch 03_ p4.qxd 10/9/04 10: 03 PM Page 83 78 CHAPTER 3: BETTER FACES ■ Diminishing ... placed the cursor on the top far left of the image of the man and the horse and “painted” the new sky. I started with a horizontal stroke, going...
Ngày tải lên: 02/07/2014, 02:20
Photoshop Elements 3 Solutions: The Art of Digital Photography- P6 pptx
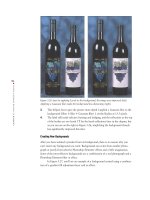
... tweaked the drop shadow by using the settings shown on the left in Figure 5 .33 . The Layers palette is shown on the right. The final image is shown in Figure 5 .34 . Figure 5 .33 : These are the settings ... used the set- tings shown on the right in Figure 5 .35 . 436 3_ch05_p4.qxd 10/10/04 11:40 PM Page 140 139 ■ ADDING DEPTH Figure 5 .32 : The original digital came...
Ngày tải lên: 02/07/2014, 02:20
Photoshop Elements 3 Solutions: The Art of Digital Photography- P7 pptx
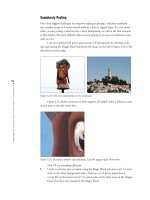
... clicking on them, and then painting the sampled areas over the cones (shown on the left in Figure 7.8). Then she sampled parts of the wall and the sidewalk and painted them over the sandwich ... and then changed to Hard Round 5 pixels as I worked on the wire near the windowsill and the wire near the top of the roof. I chose a hard-edged brush because I wanted to keep...
Ngày tải lên: 02/07/2014, 02:20
Photoshop Elements 3 Solutions: The Art of Digital Photography- P8 pot
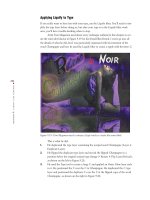
... insertion bar in the shape of an I-beam appeared at the point of clicking. I then typed in my letters. The baseline of my type lined up with the small line through the bottom of the I-beam. The I-beam ... Vertical Type. (Photoshop Elements 3 also offers control over the amount of space between lines of type. This is called leading, and most of the time th...
Ngày tải lên: 02/07/2014, 02:20
Photoshop Elements 3 Solutions: The Art of Digital Photography- P9 pps
... include ICC color profiling. With two views of your image, one showing the original image and the other showing the effects of the compression, it’s easy to compare them and choose the opti- mal setting. ... compressed the image by using the same Save for Web setting, the file size reduced to 35 4.6KB, a savings of 44KB with no loss of impor- tant details. To push th...
Ngày tải lên: 02/07/2014, 02:20

Photoshop Elements 3 Solutions: The Art of Digital Photography- P10 pot
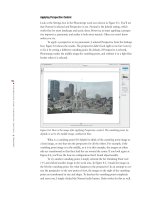
... zoomed-in shot of the edges shown in Figure 10.20 illustrates how Photoshop Elements adds variations of the Matte color to the edges of the graphic. Now when the graphic is placed against the browser ... blocked the effect of the Levels command on the mountain and sky areas of the image. 7. For the most part, the mask created by the Gradient tool was en...
Ngày tải lên: 02/07/2014, 02:20